White oak
Day 01
Proof that you need to just get off the road sometimes: Varsity burger and hotdog place. Since 1928. This must be what McDonald's was, what all fast food joints must have been like. But the Varsity has held true to its roots. Indeed, it felt like stepping back in time. Good food. Wonderful folks behind the counter. And it seemed like this is the place to come celebrate a little league win, or have some fries with your sweetie. And it kept me out of the rain. All good.

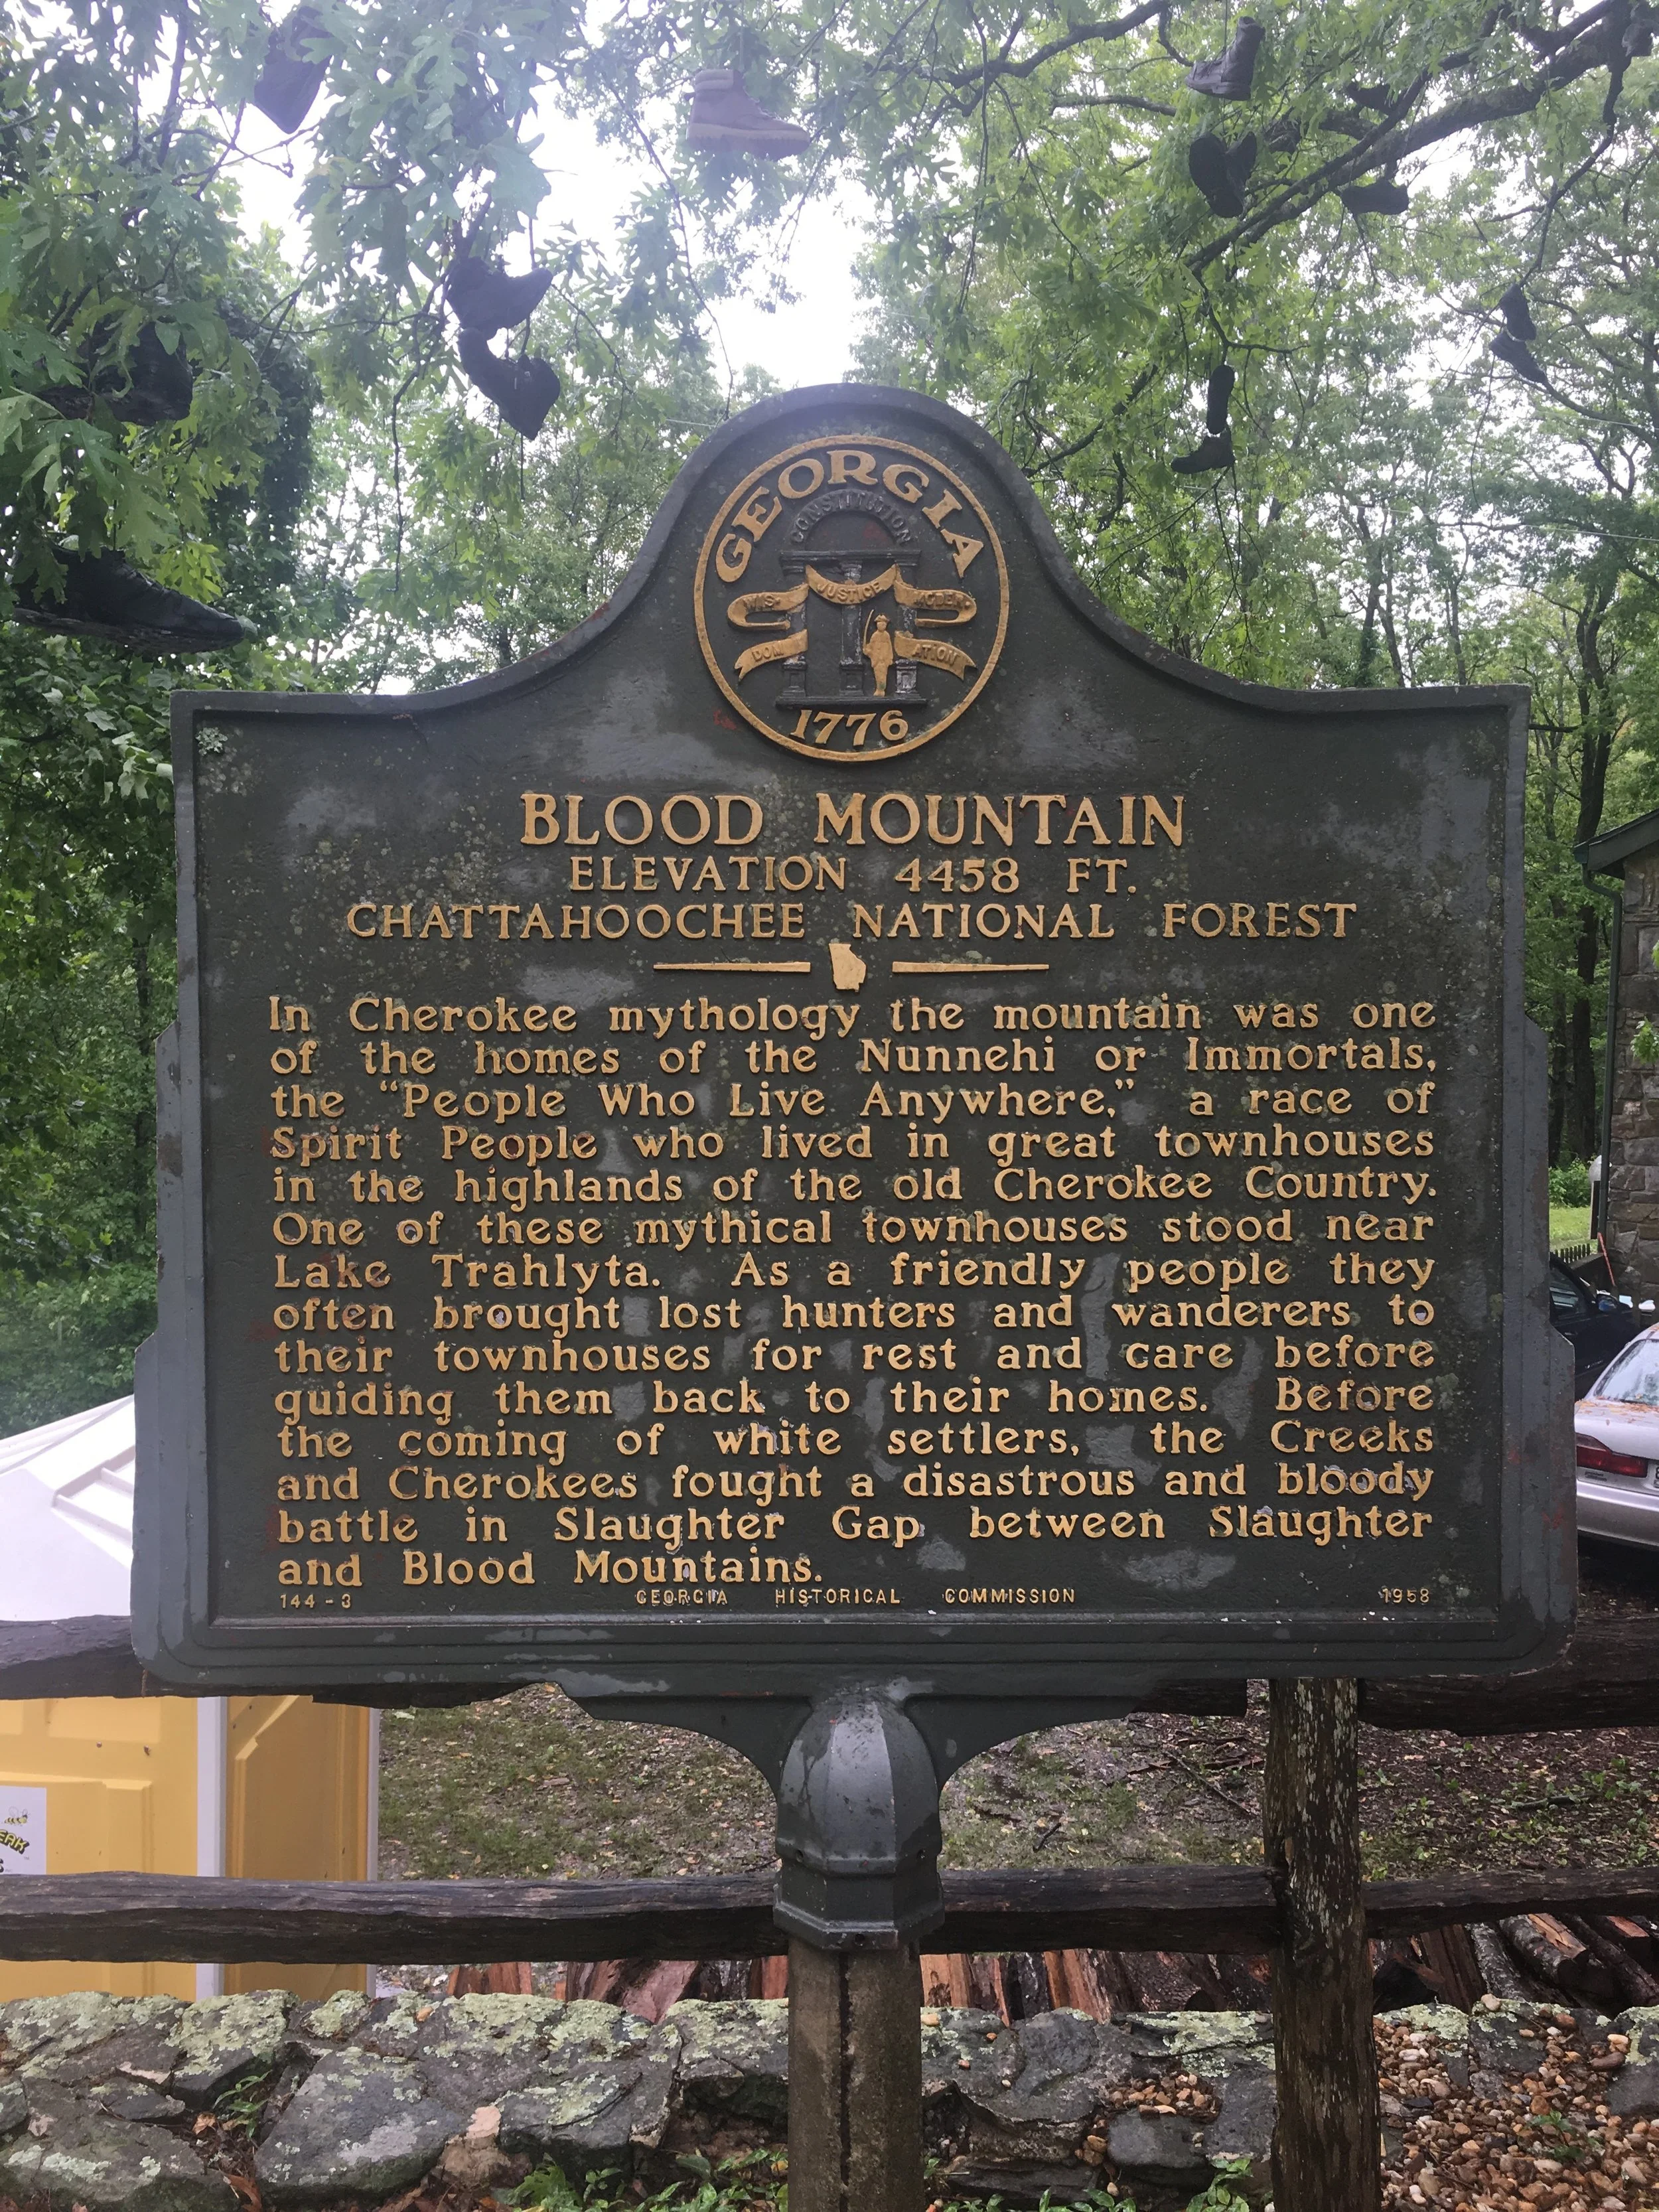
Chattahoochee National Forest, GA
I am now traveling across Georgia, following a rainstorm. From what the folks at the Varsity tell me this is much needed rain for the area. I'm here to weave with white oak, something I've never done before. I'm headed towards Brasstown, North Carolina, and the John C. Campbell Folk school. Bill and Maryann Smith will be teaching us, starting with a white oak log (bark and all), and working it (splitting, carving, sanding) to make all the parts for a finished basket. I'm more than excited for this learning to begin. Taking the rawest of materials, being in control of making each element, and weaving to a finished functional object (that hopefully looks good too) will be, I am sure, an amazing experience.
I flew into Atlanta. Brasstown is a 2 1/2 hour drive due north into North Carolina. It located near Smokey Mountains National Park. I feel lighter as I drive along. I think just leaving my responsibilities back home gives me that feeling. There's something about getting away and going to learn something new that is a release. It's also about being given the gift to focus on a single activity or idea, unencumbered. (Thanks to my family for allowing me the space to come and weave!) It's a very nice drive to Brasstown. I made a wrong turn out of the airport, Google rerouted, and I think ended up taking me a slightly longer, but WAAAAY more picturesque route. Lots of churches, lots of mountains, a few antique stores, and a good burger (see above).


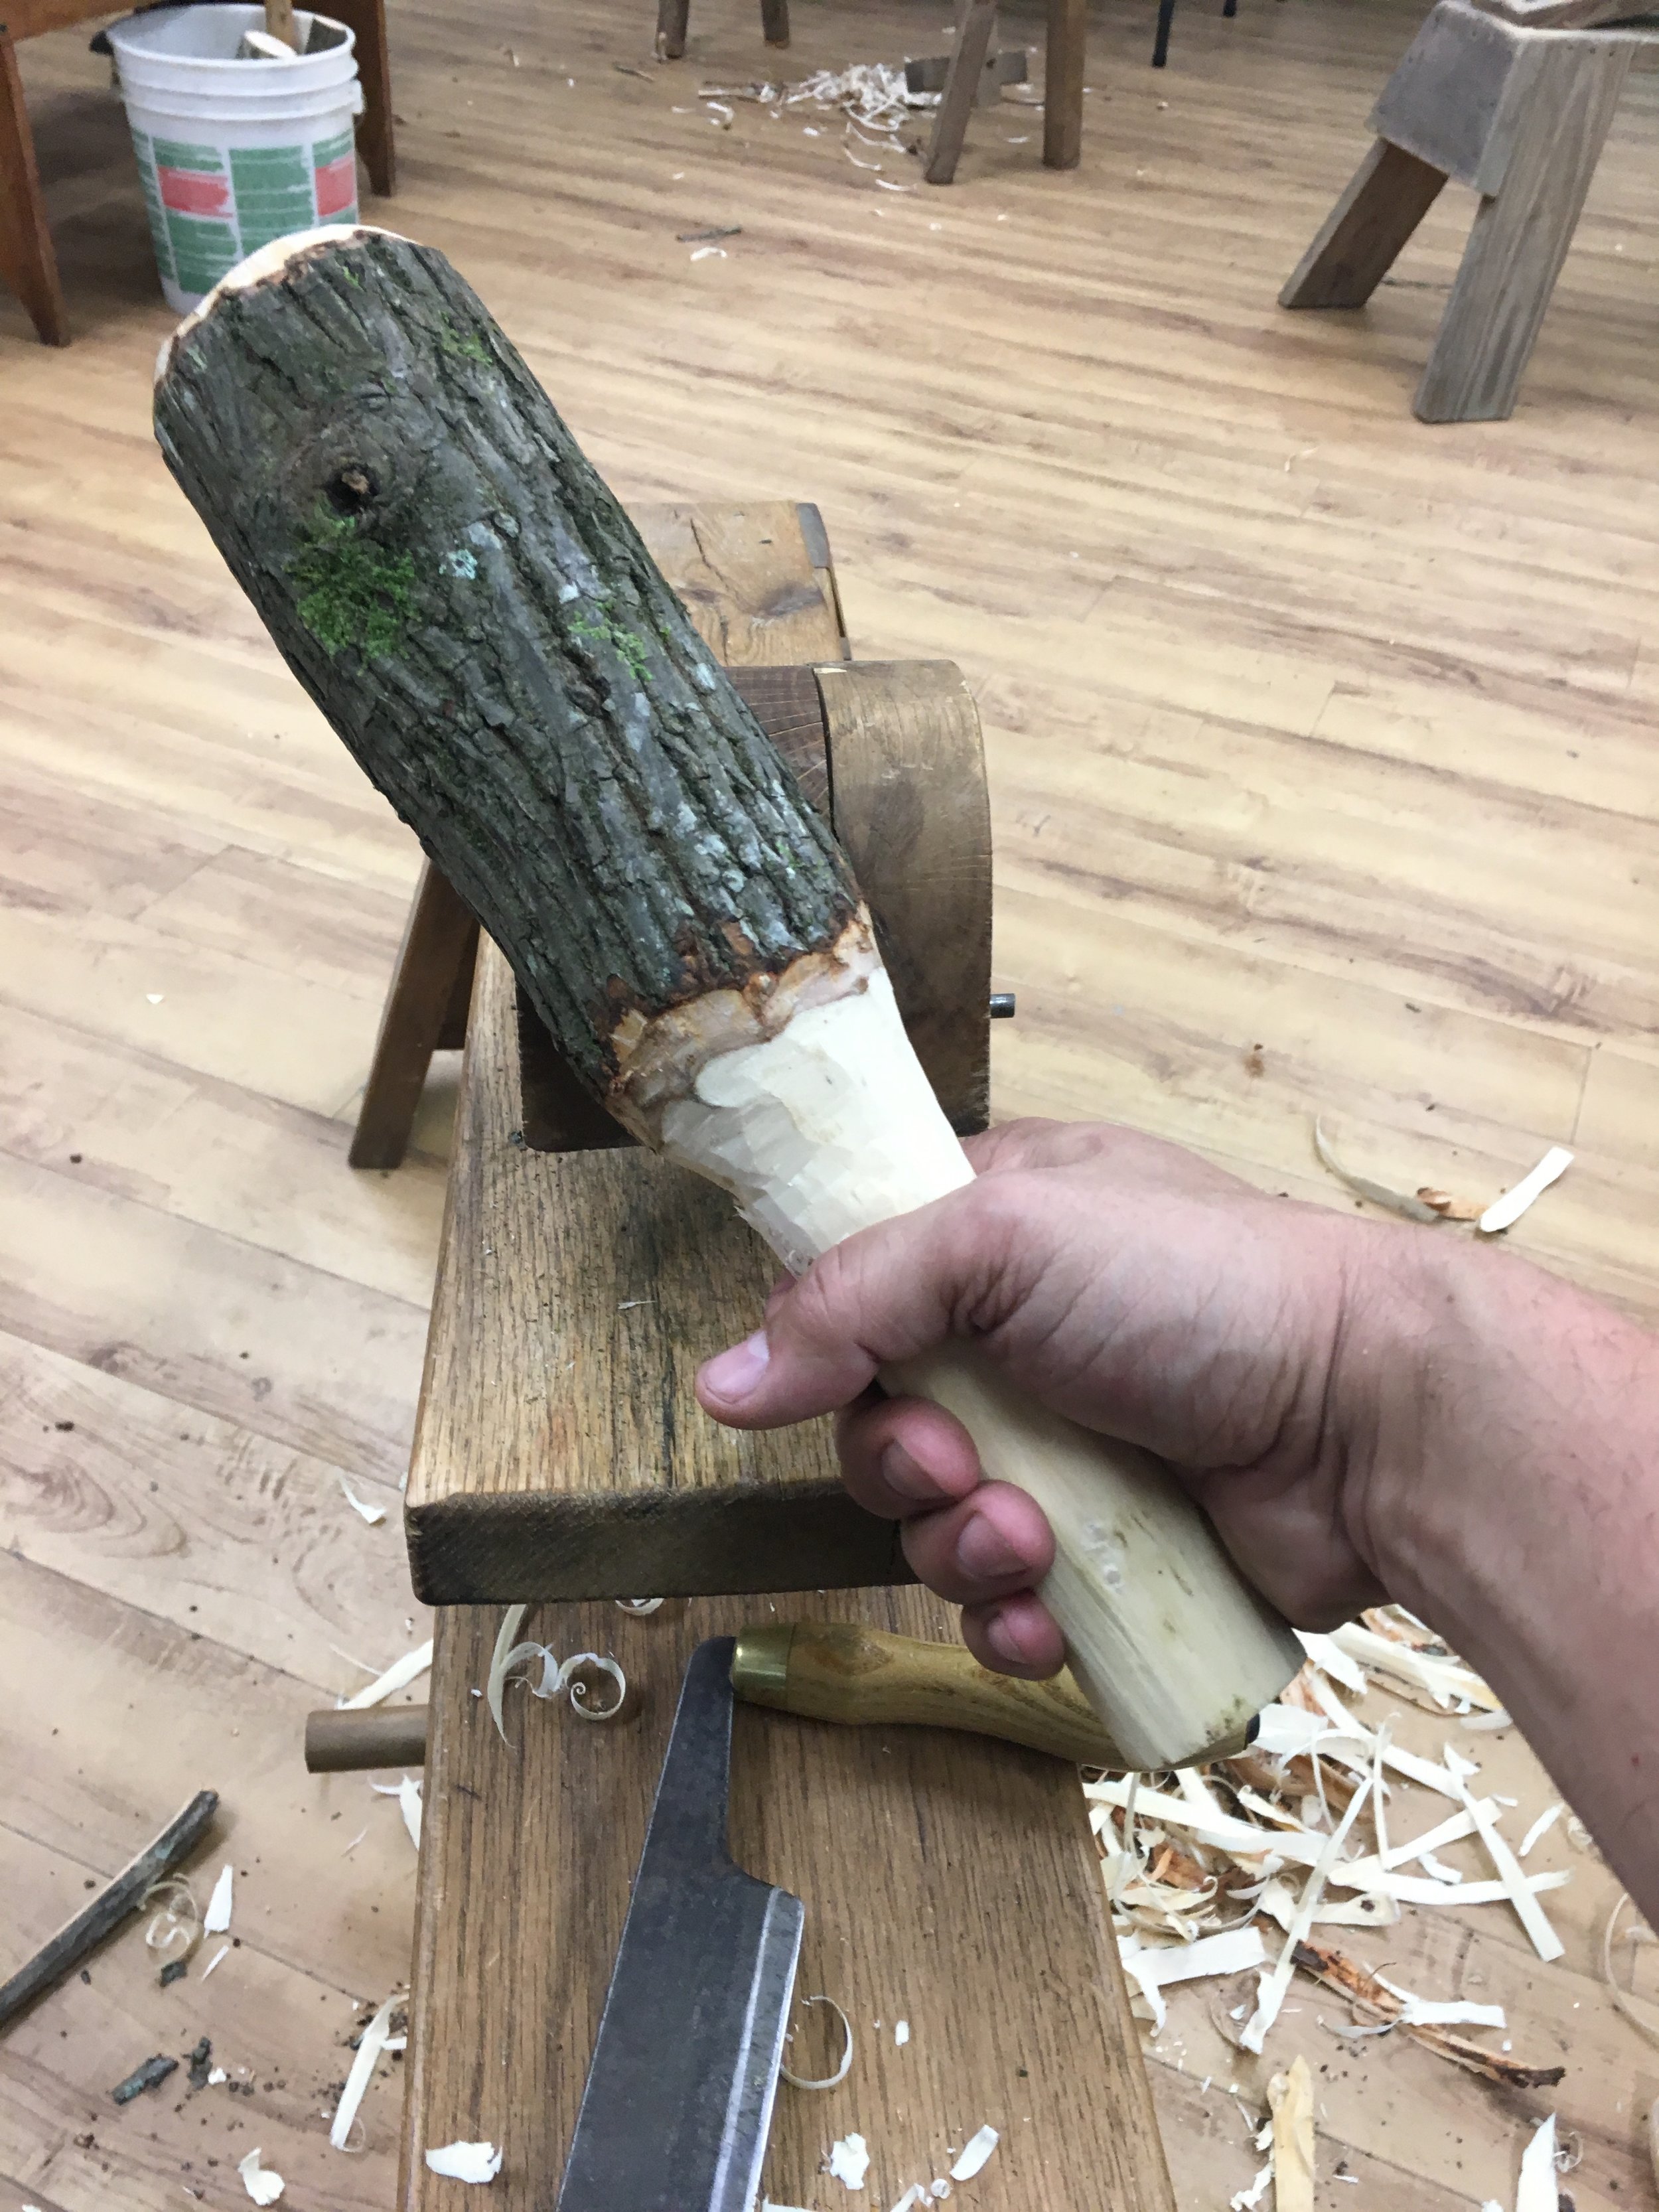

Our first class starts right after dinner. Beautiful first class. Bill and Marianne Smith are both very welcoming, and enthusiastic about the work. We start the class by learning how to use a draw knife and a shave horse to make a wooden mallet out of a piece of a Hickory tree; working a segment of a thick branch. It's fun to make the bark fly, and a bit of a workout. The maul we are making will be a tool we use to split the oak logs (that's tomorrow), and proves a great way to get to use, learn, and understand how a draw knife works.
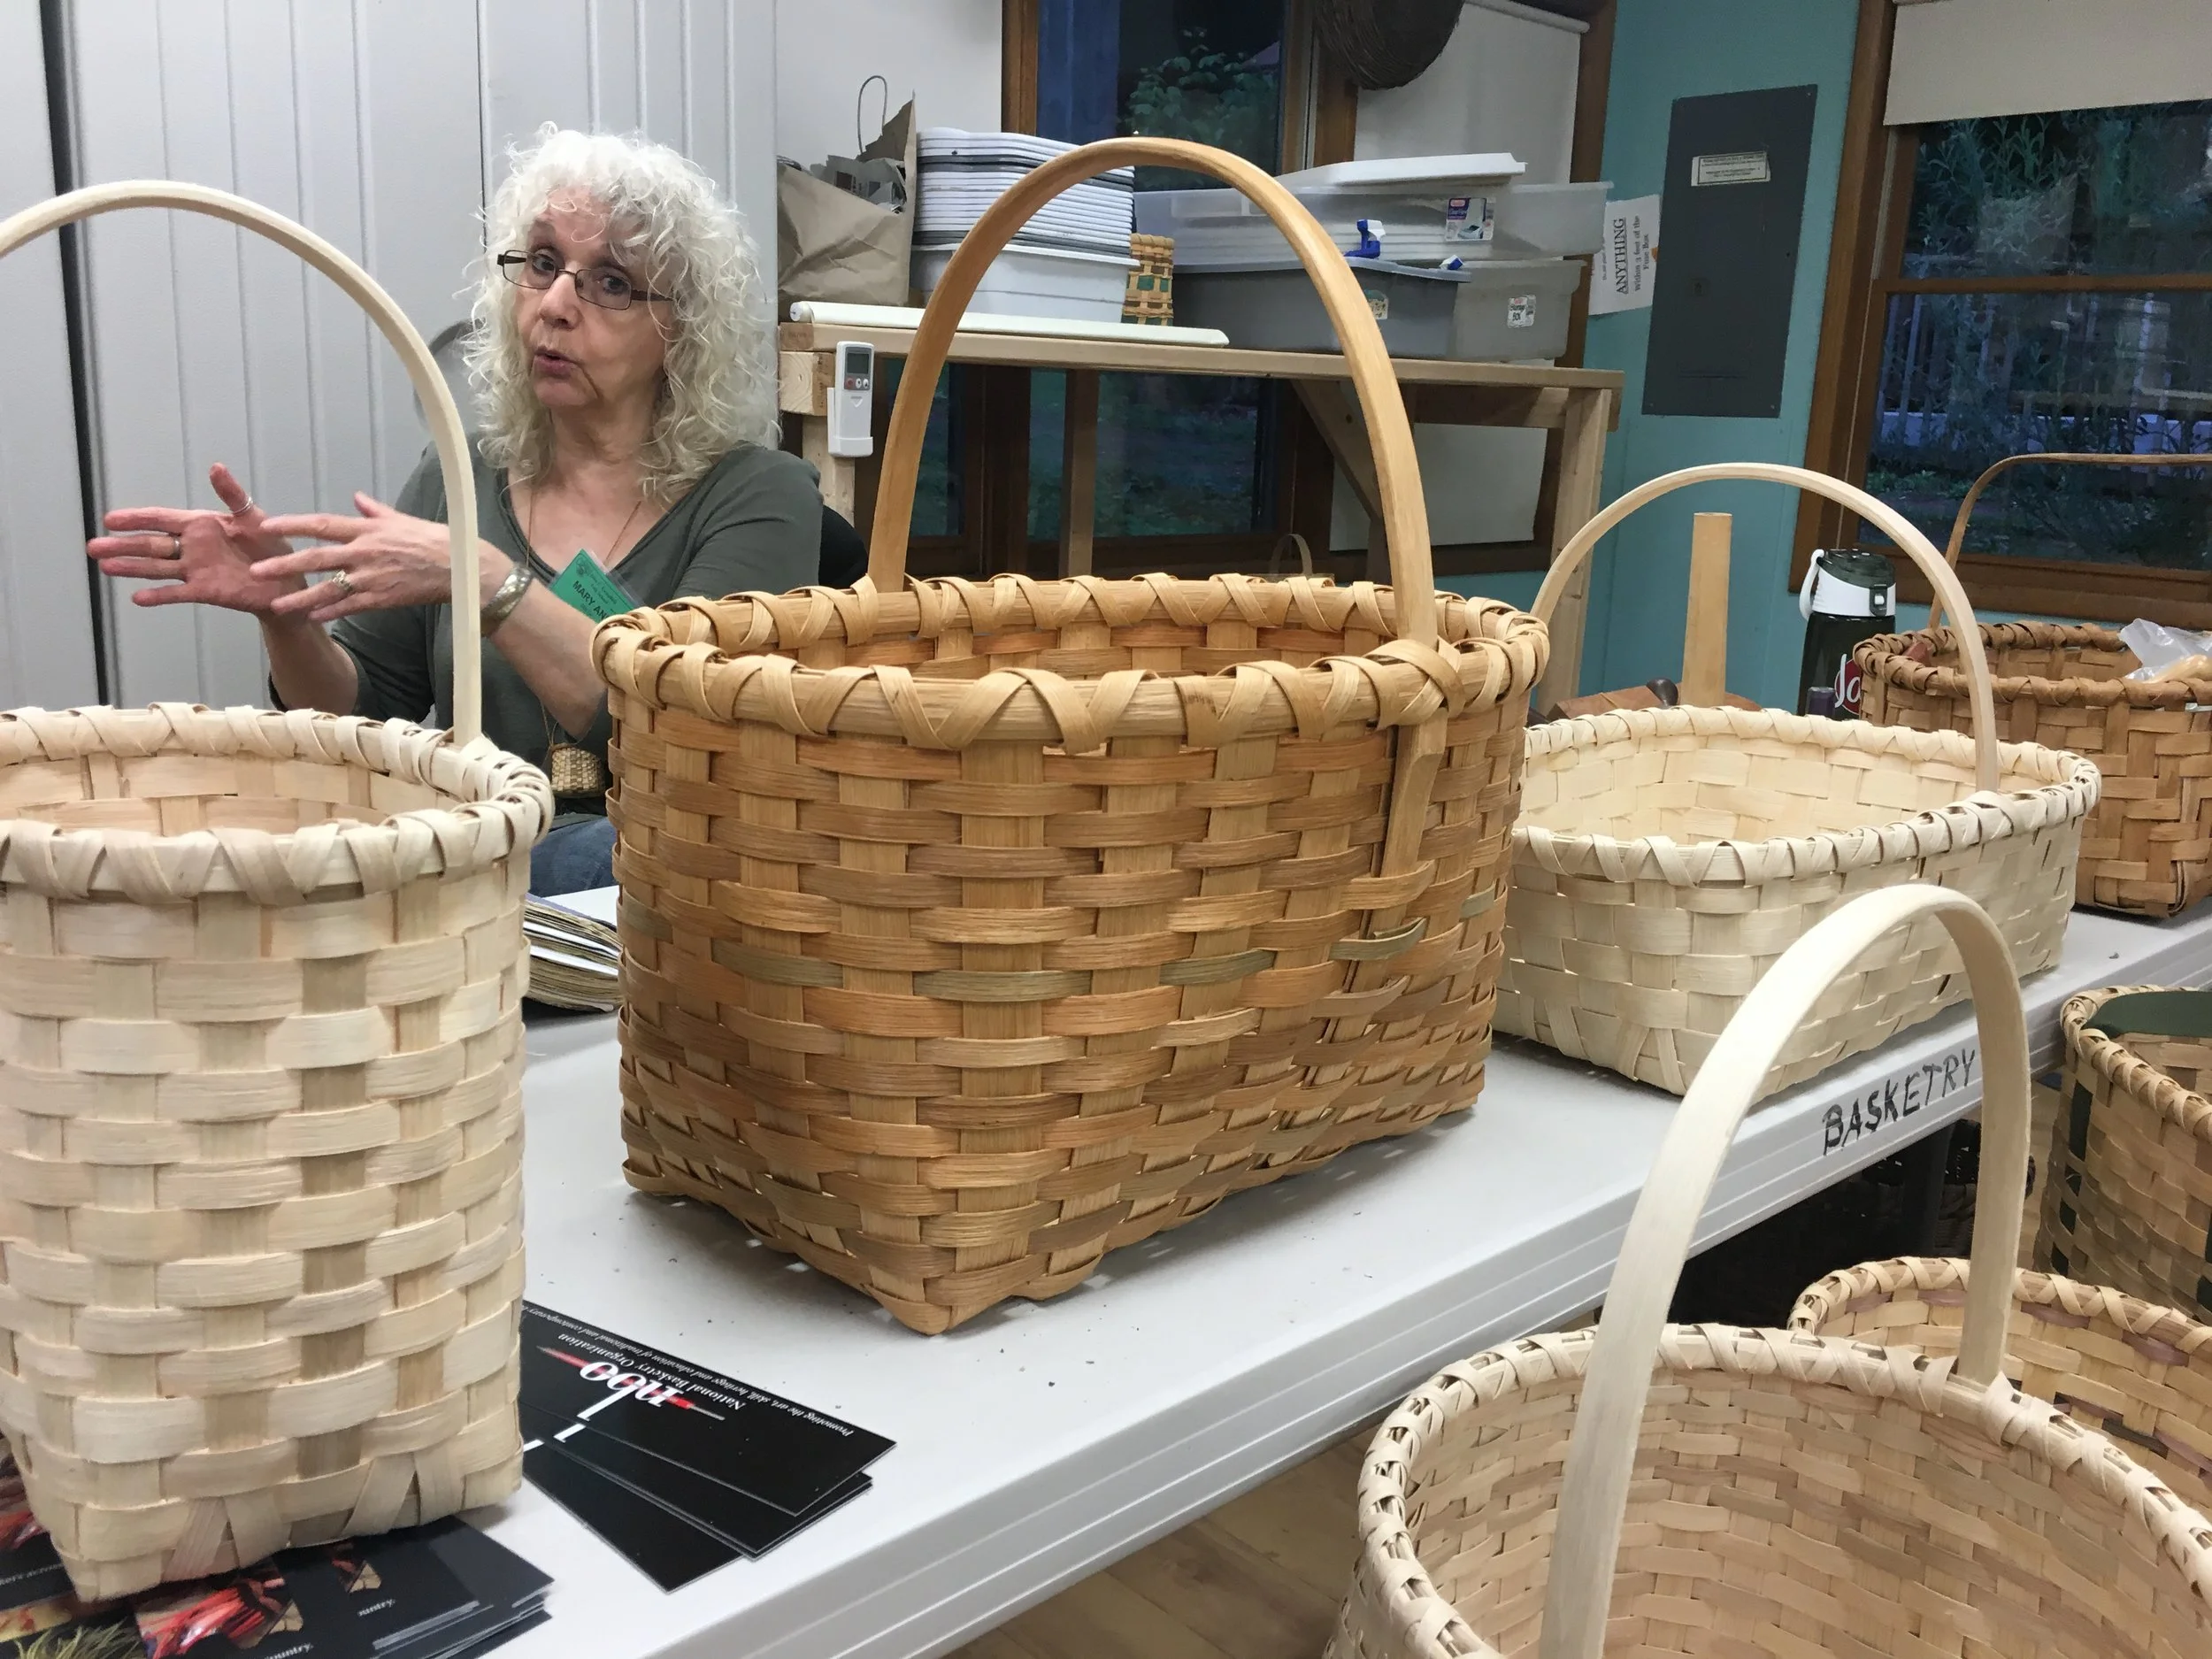
MaryAnn informs us we need to choose the style of basket that we want to make, and she would like it done tonight. Selecting the type of basket we are going to attempt will allow us to plan what white oak materials we need to make. But MaryAnn makes the 'mistake' of saying she really must know by first thing in the morning, and so I know I have the night to think on it. And I tell her that I will take the night to think on it. For me it's a big decision as I will be working on this basket for the next 5 days. This is a once-in-a-lifetime chance and I don't want to blow it.
Bill has brought a number of logs with him from Alabama. These we will split and shave down for various parts of the basket. There are many different sizes of roughing out wood all dependent on which part of the basket you're making. Handles are the thickest, rims are next, then spokes, and finally weavers. He briefly explains this to us as we will start on the log in the morning. I can hardly wait to start working on the wood.
it's nice to talk with other basket weavers. MaryAnn has taken a number of classes with another with a number of basket weavers and learned so much from them. It's nice to know that people even with her level of experience (30+ years) are still learning from others.
This evening I spent sometime with some books I brought with me that focus on white oak basketry. And I think I found the basket I'm going to make. I guess it's a type of harvest or bushel basket, with two small handles. I'm hoping they'll let me do this, because I just don't find a single handle aesthetically pleasing at all. I'm ready to get started...


Day 02
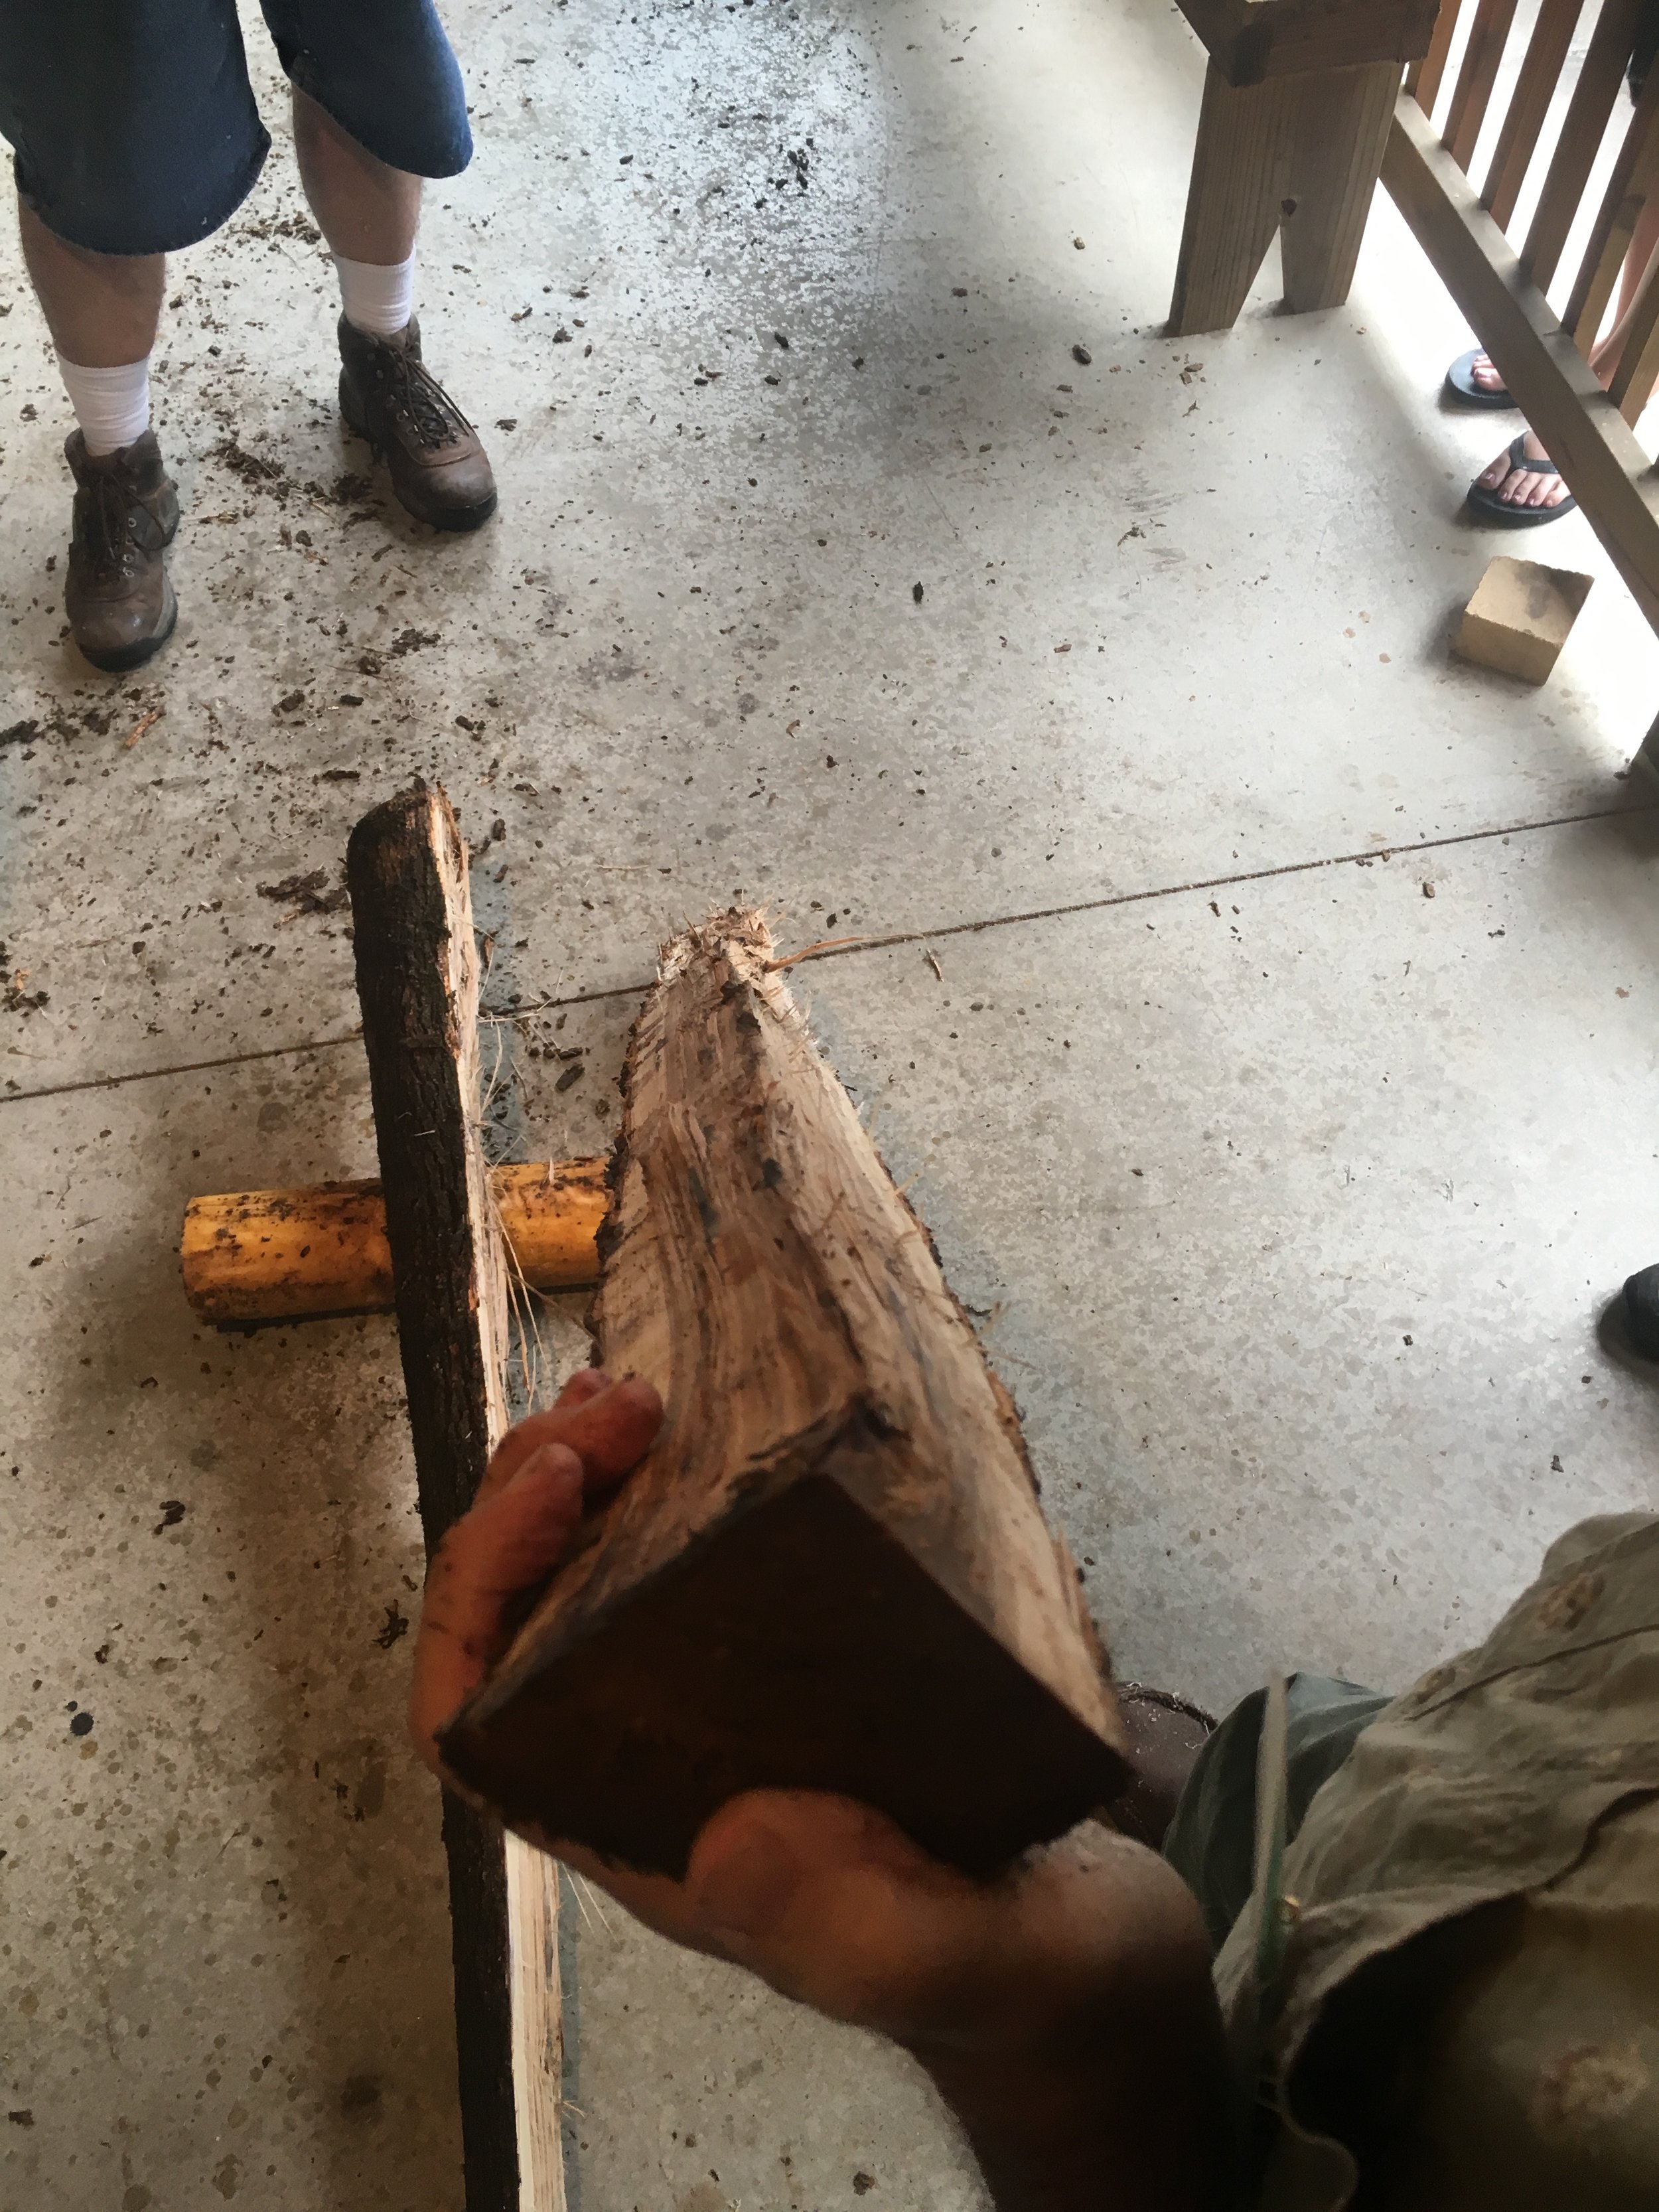
We started splitting the white oak logs this morning. Starting with the log about 4 to 6 inches in diameter. Using a hatchet you mark a straight line at the small end of the log (each log has a slight taper to it). Using this line as a guide, the hatchet is driven into end to split the log. A pair of wedges are then used to split the log in two. Bill says that he can tell right away, and can even hear, if a log is going to be a good one. If this first split starts to twist or turn, anything but perfectly straight, we will toss the log to the side...it's firewood.
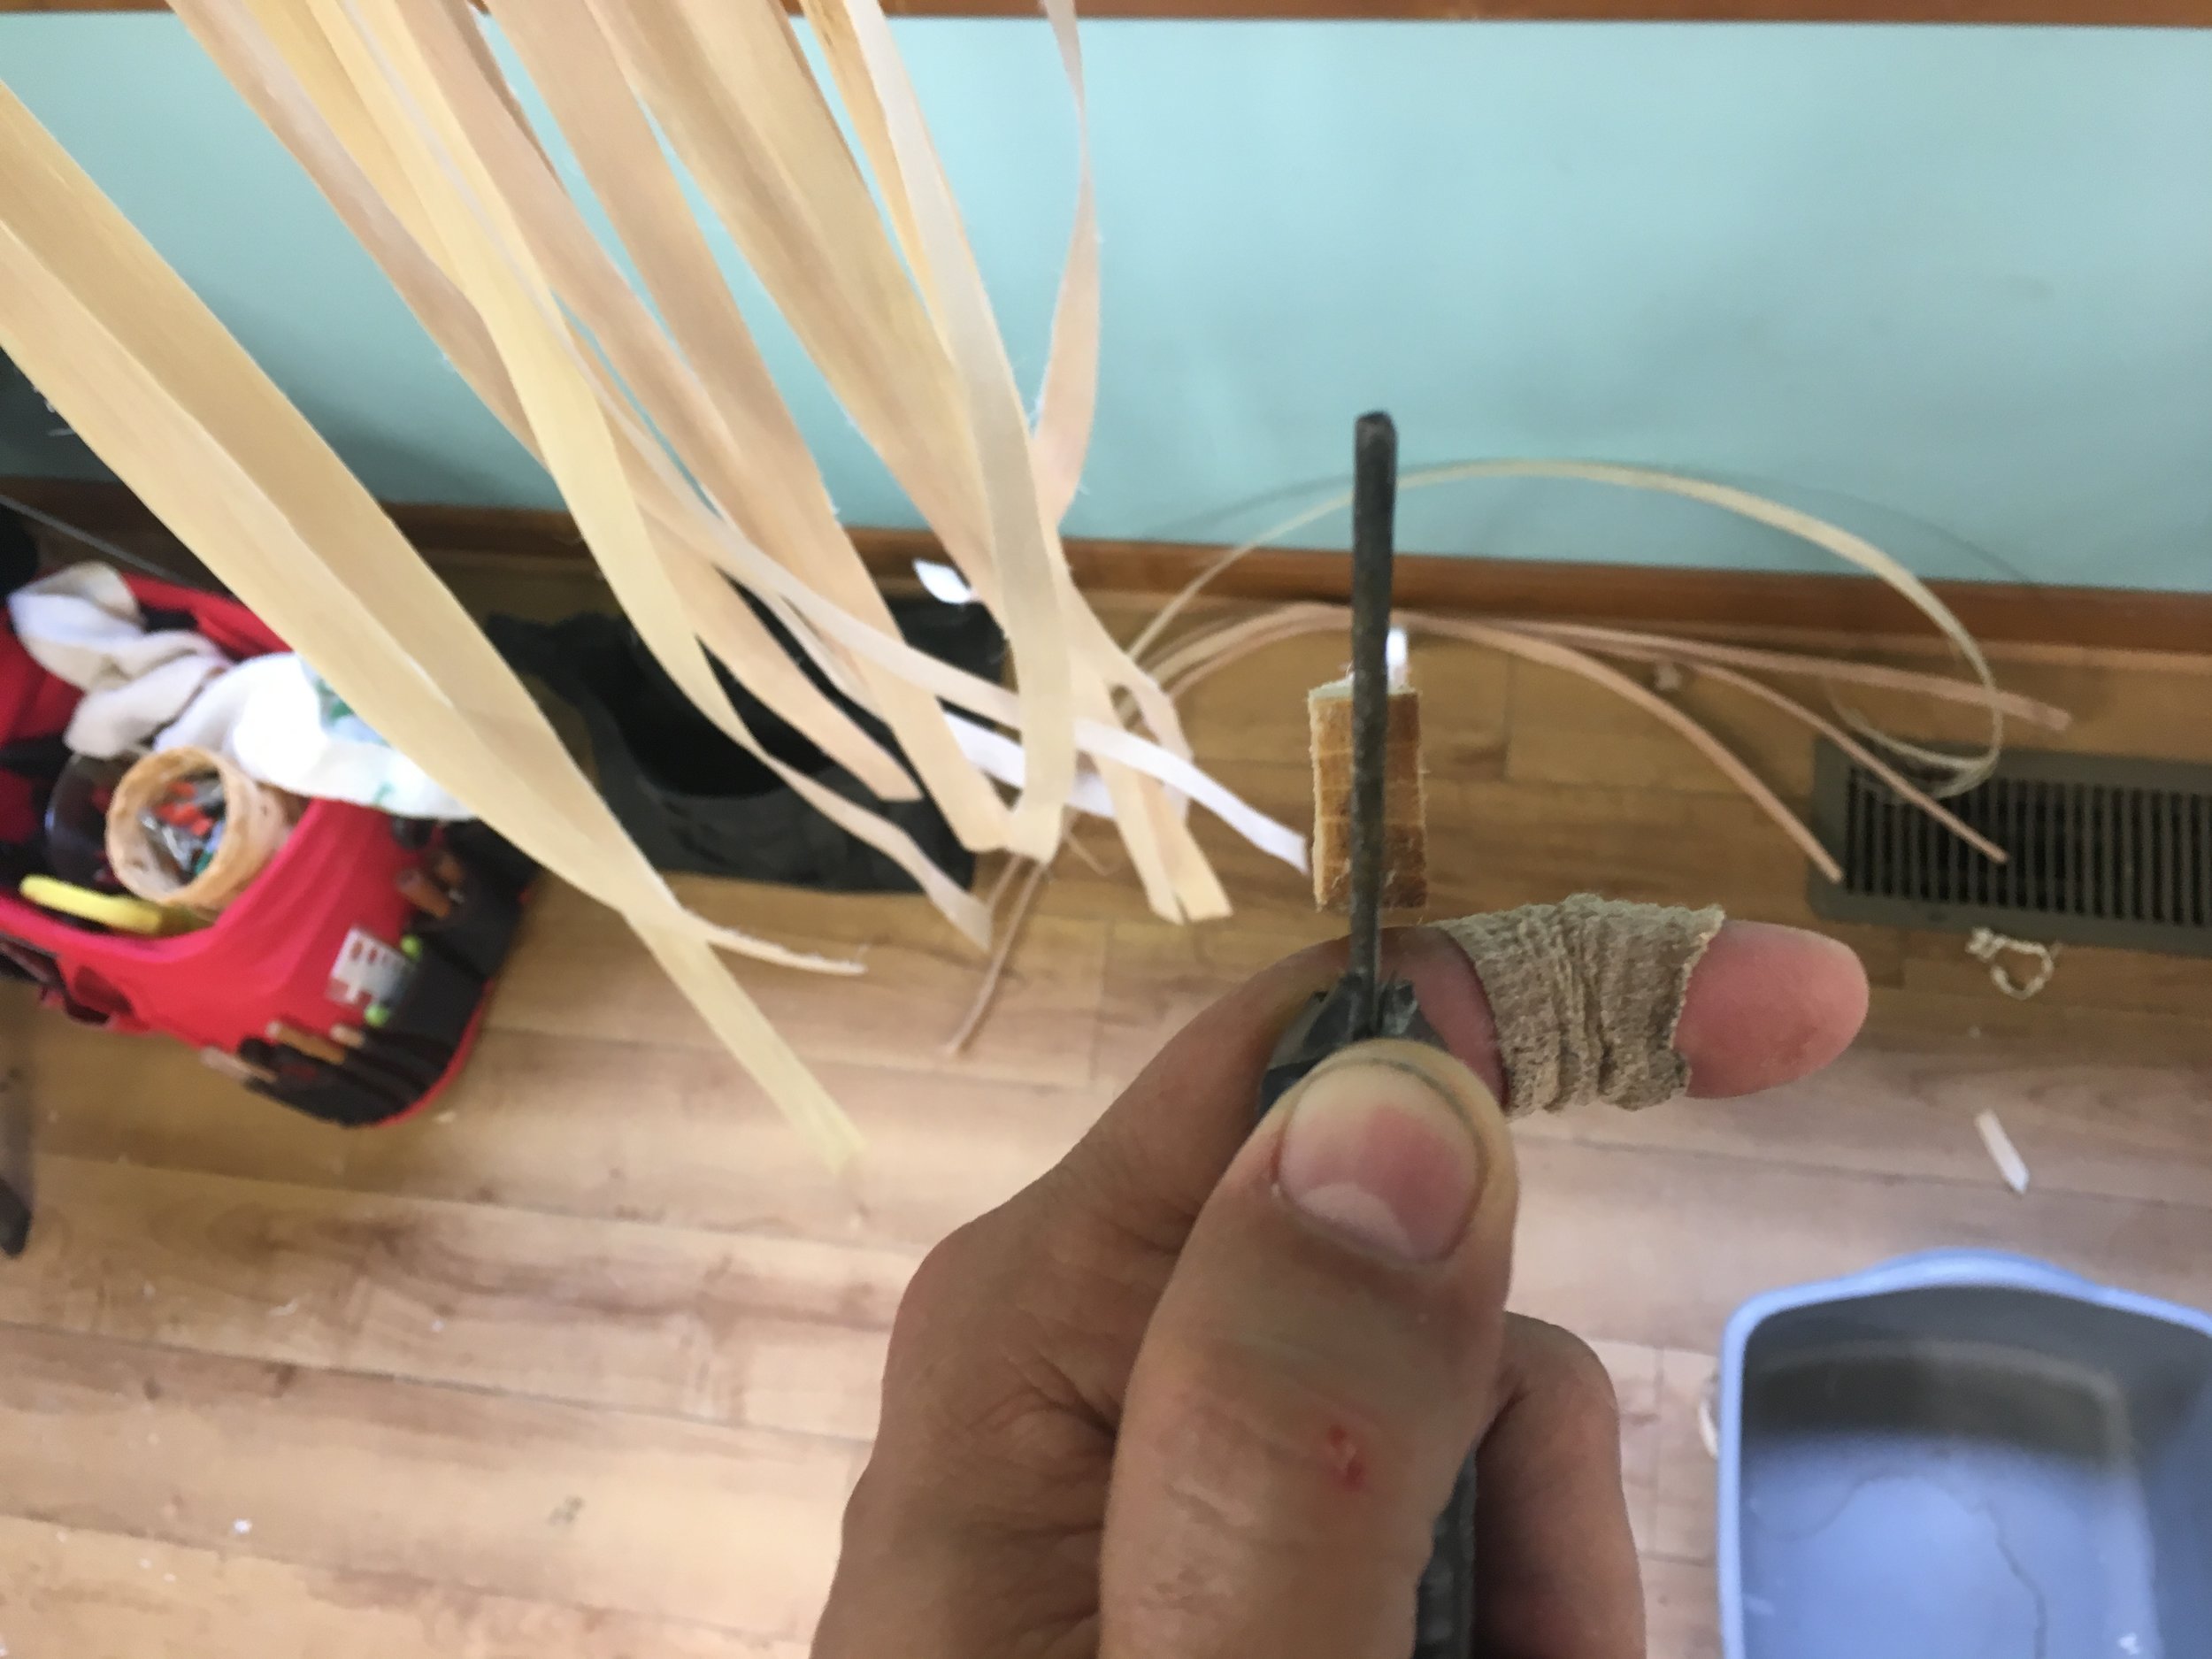
Once the log is split in two, we use an old butcher knife and our hickory maul to split each half again in half, and then again to get eight relatively equal parts. Bill then removed most of the heartwood (the darker wood at the center of the log), leaving about a 1/4" of it on top of the sapwood (the lighter colored wood at the perimeter of the log). If the heartwood is thick enough, and looks pliable enough, you can save it to make rims and handles. With all of this there is a judging process, a study of each piece of the log for twists or turns. Once the log is split into 8, and the majority of the heartwood removed, we use the draw knife to first strip the bark of each billet (see video above), then to square up each piece making it squared parallel to the outside edge (bark side) of the sapwood. (See video below). I'm including a series of videos here that will give you an idea of the process after the log is split.
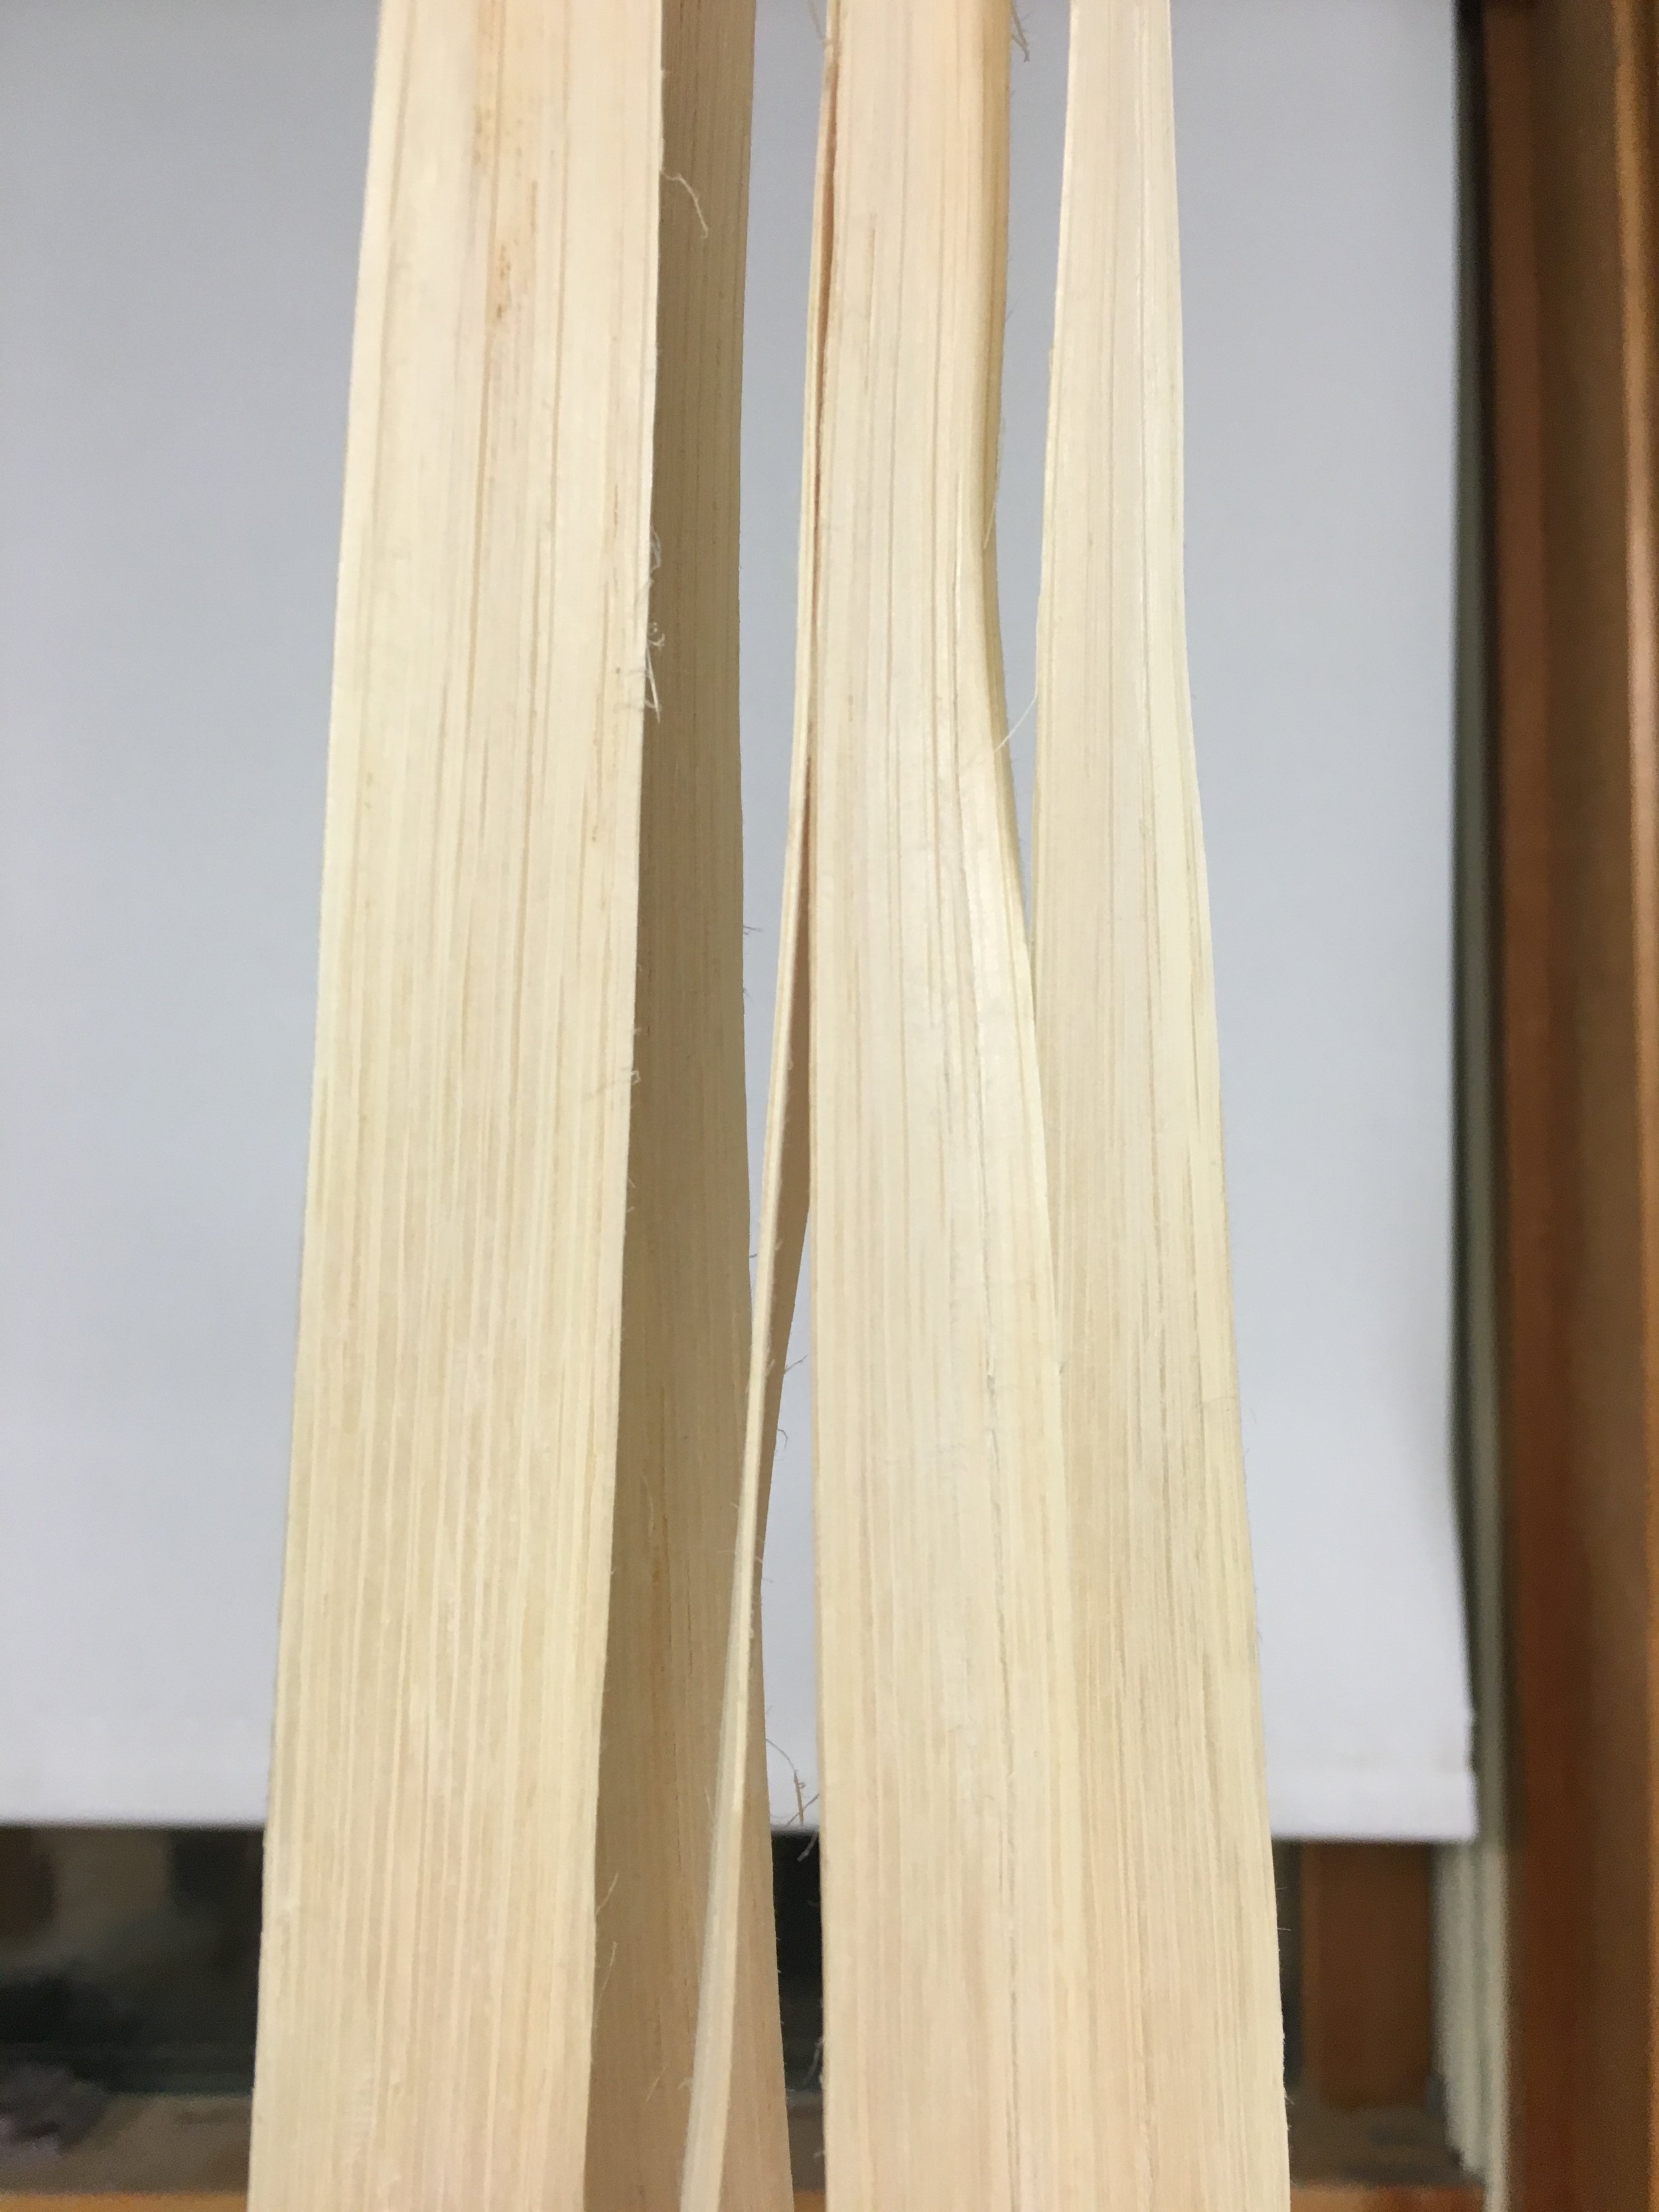
After a piece is squared, we start to split the billet, first in half, then again and again. Ideally we want to get 8 pieces from each of the 8 billets (sometimes more) so in the end we have 64 pieces, weavers and/or uprights. After each split, we use the draw knife to clean it up, and then split again. Clean the piece and split again. Continue to split until we can't split anymore without losing one of the two pieces. This is of course a true judgement call, and can only be confidently made after years of practice. So of course we are all asking Bill what he thinks, and if we can split more out of a piece.
Once split as far as possible (for our novice hands), each weaver is finished using first the draw knife (rough), then a scraping knife across the knee (finer), and finally a bit of sanding (finest). A good scrape will make lovely curls of oak; there is a lot of the log that ends up on the ground. Between all of us students, we make quite a mess very quickly.
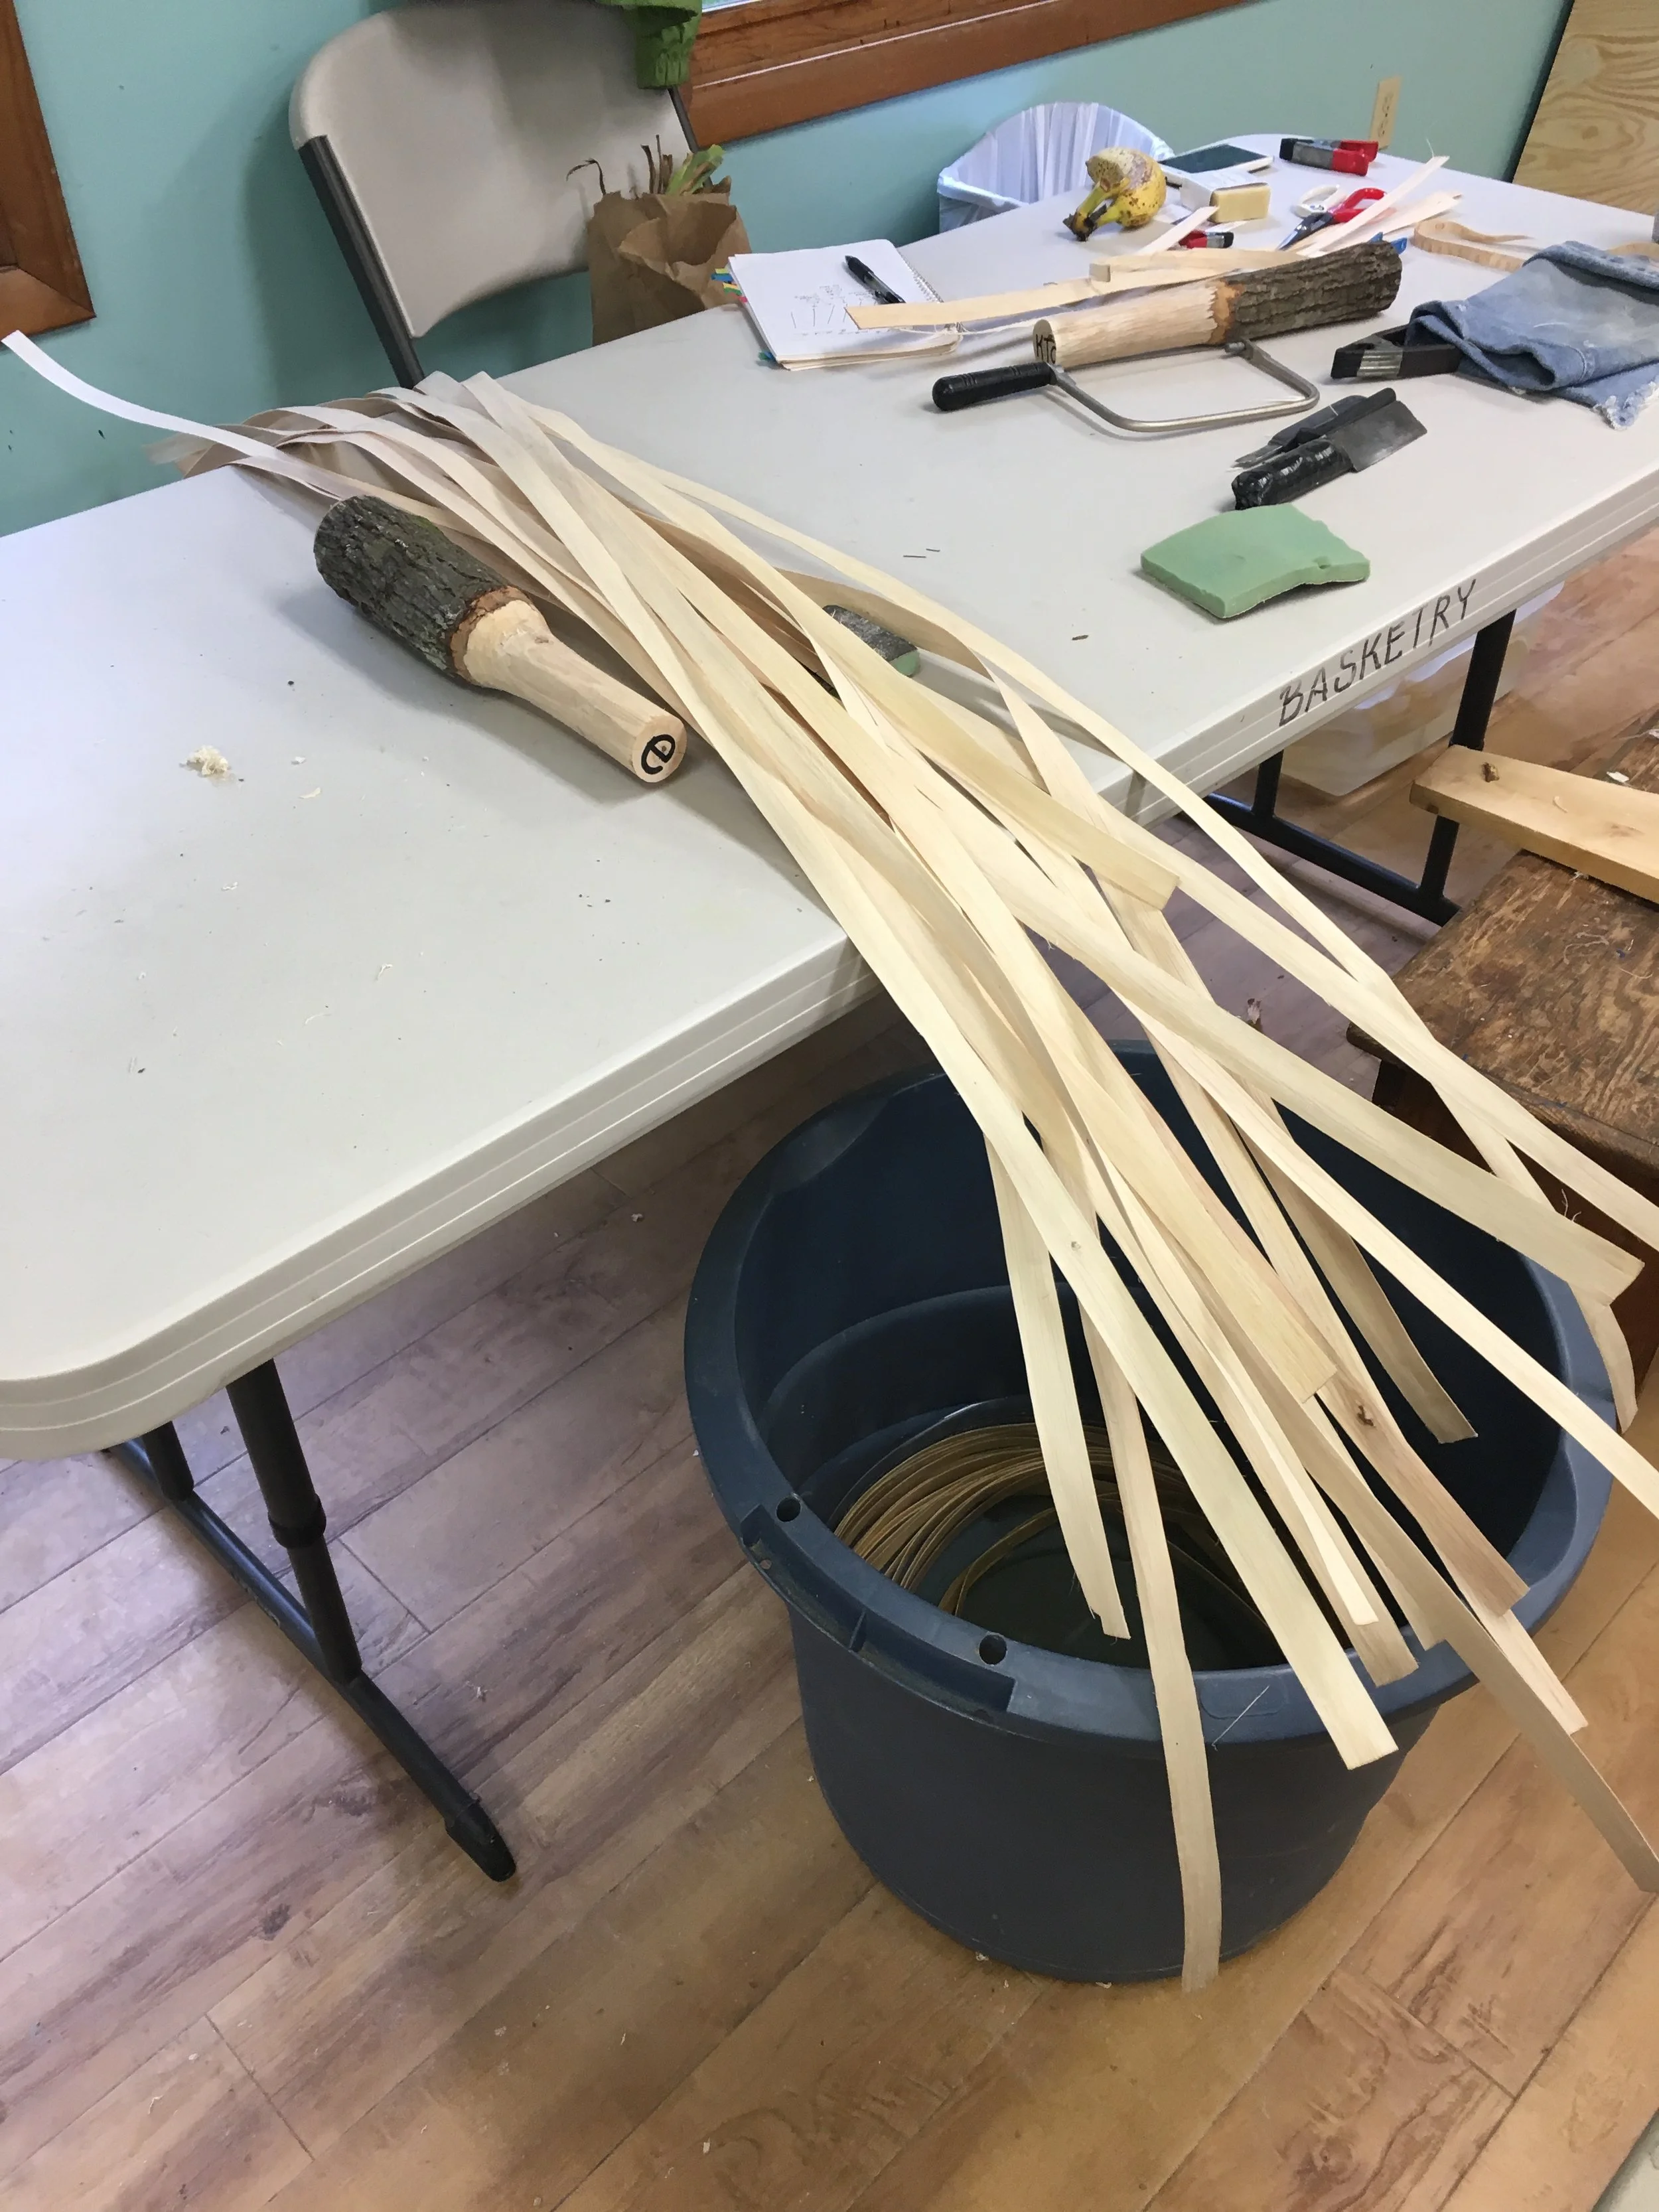
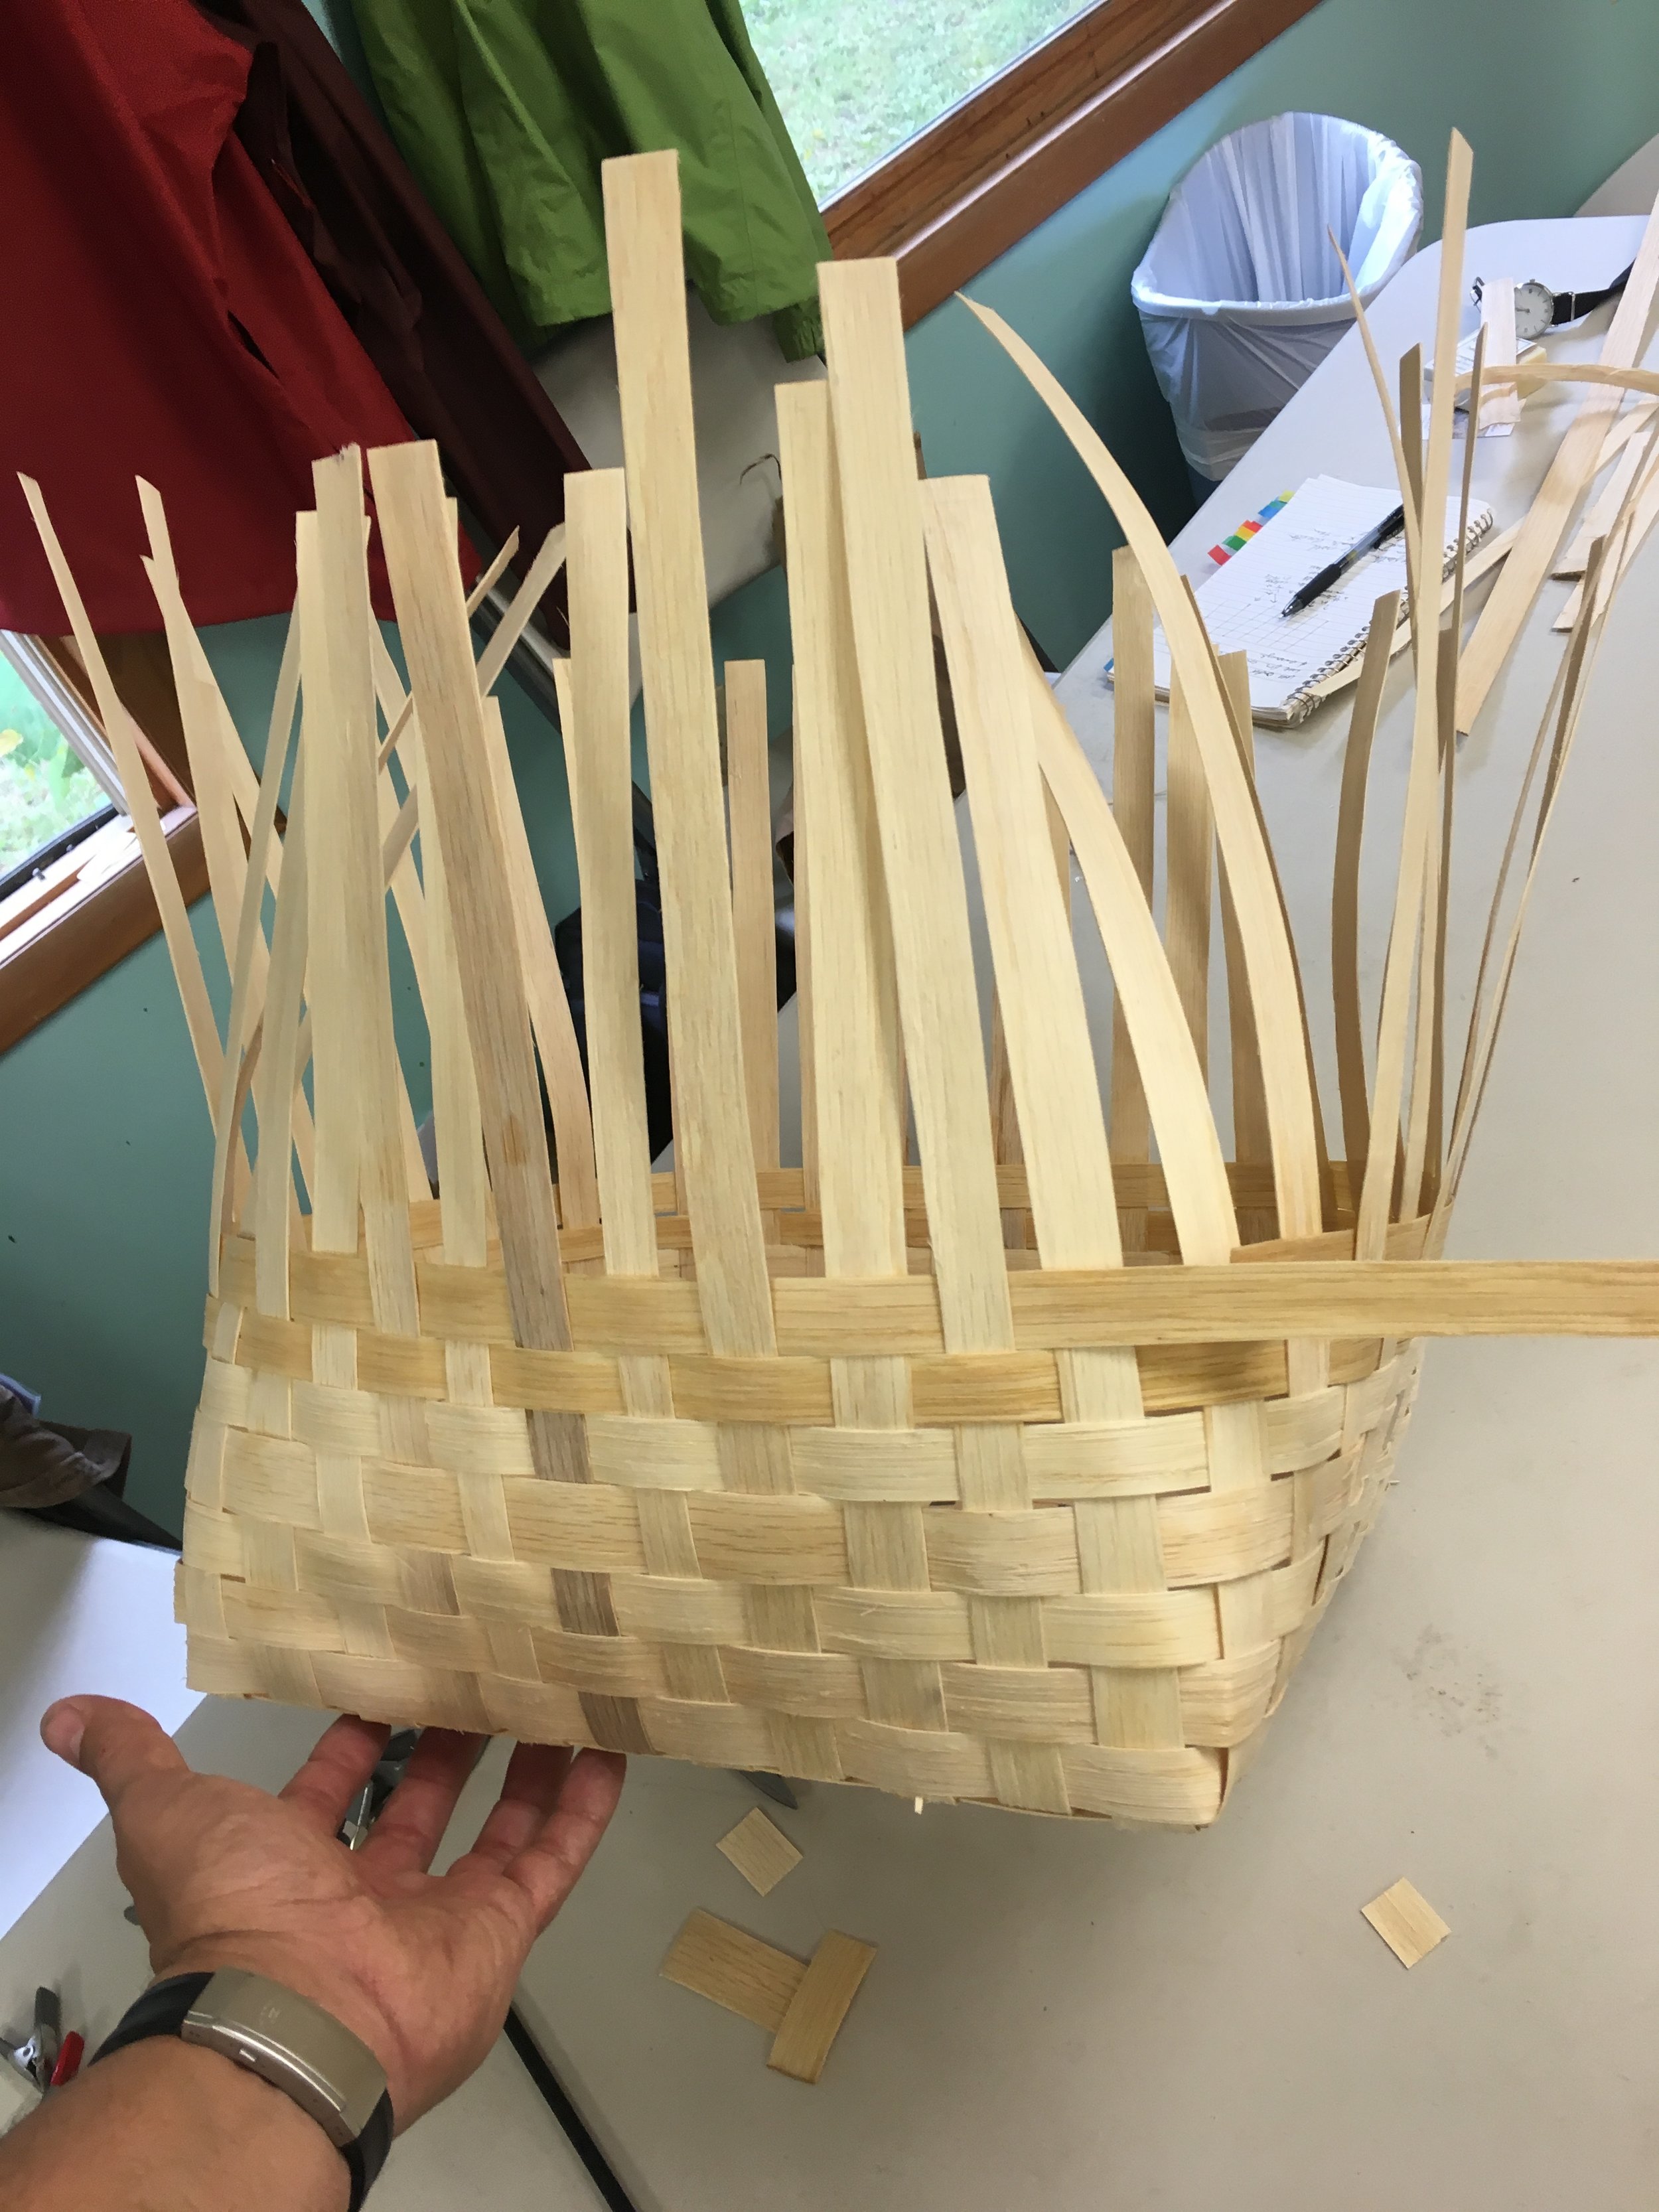
And that's basically what we did on day two; all day. We split and split and scraped and scraped. My hands are tired but feel well used. The teachers are great, and offer tons of help and wonderful stories along the way. But it is slow going, and somewhat hard to believe that any of this will eventually be a basket. You can see the finished weavers I made in the photos above. After a day of work there are only 6 weavers, but lots learned.
After dinner, we were treated to some incredible Bluegrass and country blues music in the great Hall, a wonderful surprise. It was really really good. So far the food's been great, but it's raining which is too bad because it's nicer to walk everywhere, rather than drive...but that's the way goes. I'm not sure making white oak is for me. It's a lot of work, which I don't mind, but I can't imagine having the time to do it on a regular basis. We'll see.
Day 03


Lots of scraping today. I feel like it at least I'm beginning to understand the cleaning process, and it keeps getting better, faster even. Of course there are the couple blisters forming, but I guess that's what you pay to get the nice material. It's a process of rough to smooth, you start with the log and you end up with the fine smooth weaver. You have to go through the proper steps to get the final result, there is no shortcut that I can see other than focus, a little muscle, and lot of determination. Clearly, like anything that results in fine work, your fingers and your eyes improve with practice. You can start to see what rough wood might work better than others. It's effort plus trial and error. Below are videos that show some of the process involved in making the various elements of the basket.
The big fun of the day with splitting of another white oak log. I had an opportunity to do the entire thing by myself, with some advice and coaching from the guys as to where to place the wedge or how to hit the hatchet. Watching Steve, who's done a lot of this work, you can see the years of experience and how natural it is for him. I've never even chopped wood. But the logs went well, and even though there were some questionable knots it's turned out to be some really great splitting wood for everybody. As Bill said, sometimes you don't know what the logs going to give you until you work with. There's no real telling what it's going to do.
This new log isn't making the longest finish pieces, but seems to be splitting better than any we've seen today. Bill says it's "a one in 10 log" and very rare in terms of the ease and straightness of the splits. John split one log before me and it twisted as he opened it up. Nothing to save, so we just took it and put it to the side. It will become firewood. Kind of crazy considering that Bill cut down the tree somewhere in Alabama, hauled that out with his four-wheeler, put it in his truck, drove it all the way to North Carolina, where it sat around for a week waiting for class to start. But it wasn't until John split it today that anyone could know that it wasn't going to work. That's a long way to haul firewood.


Day 04
I finished the rest of my white oak uprights today. Stayed up till 12:30 AM to get it done. It was nice of Beth, a woman who is in the class, to stay in studio doing her own work until I was finished. We are not allowed to work alone in the studio so we need a partner to keep going; without Beth's generosity I don't think I could get the basket completed by the end of class.
As of right now I am in a lot of pain. My elbow, my shoulder, and my hands really hurt from this work. And not in a good way. The work however is going well. I made some great progress today, and I've really gotten a feel for how to work with the white oak. I do wish I had a little more time so I could enjoy the process a bit more. With the end of class fast approaching I have had to create a schedule of tasks in order to see a path leading toward completion.
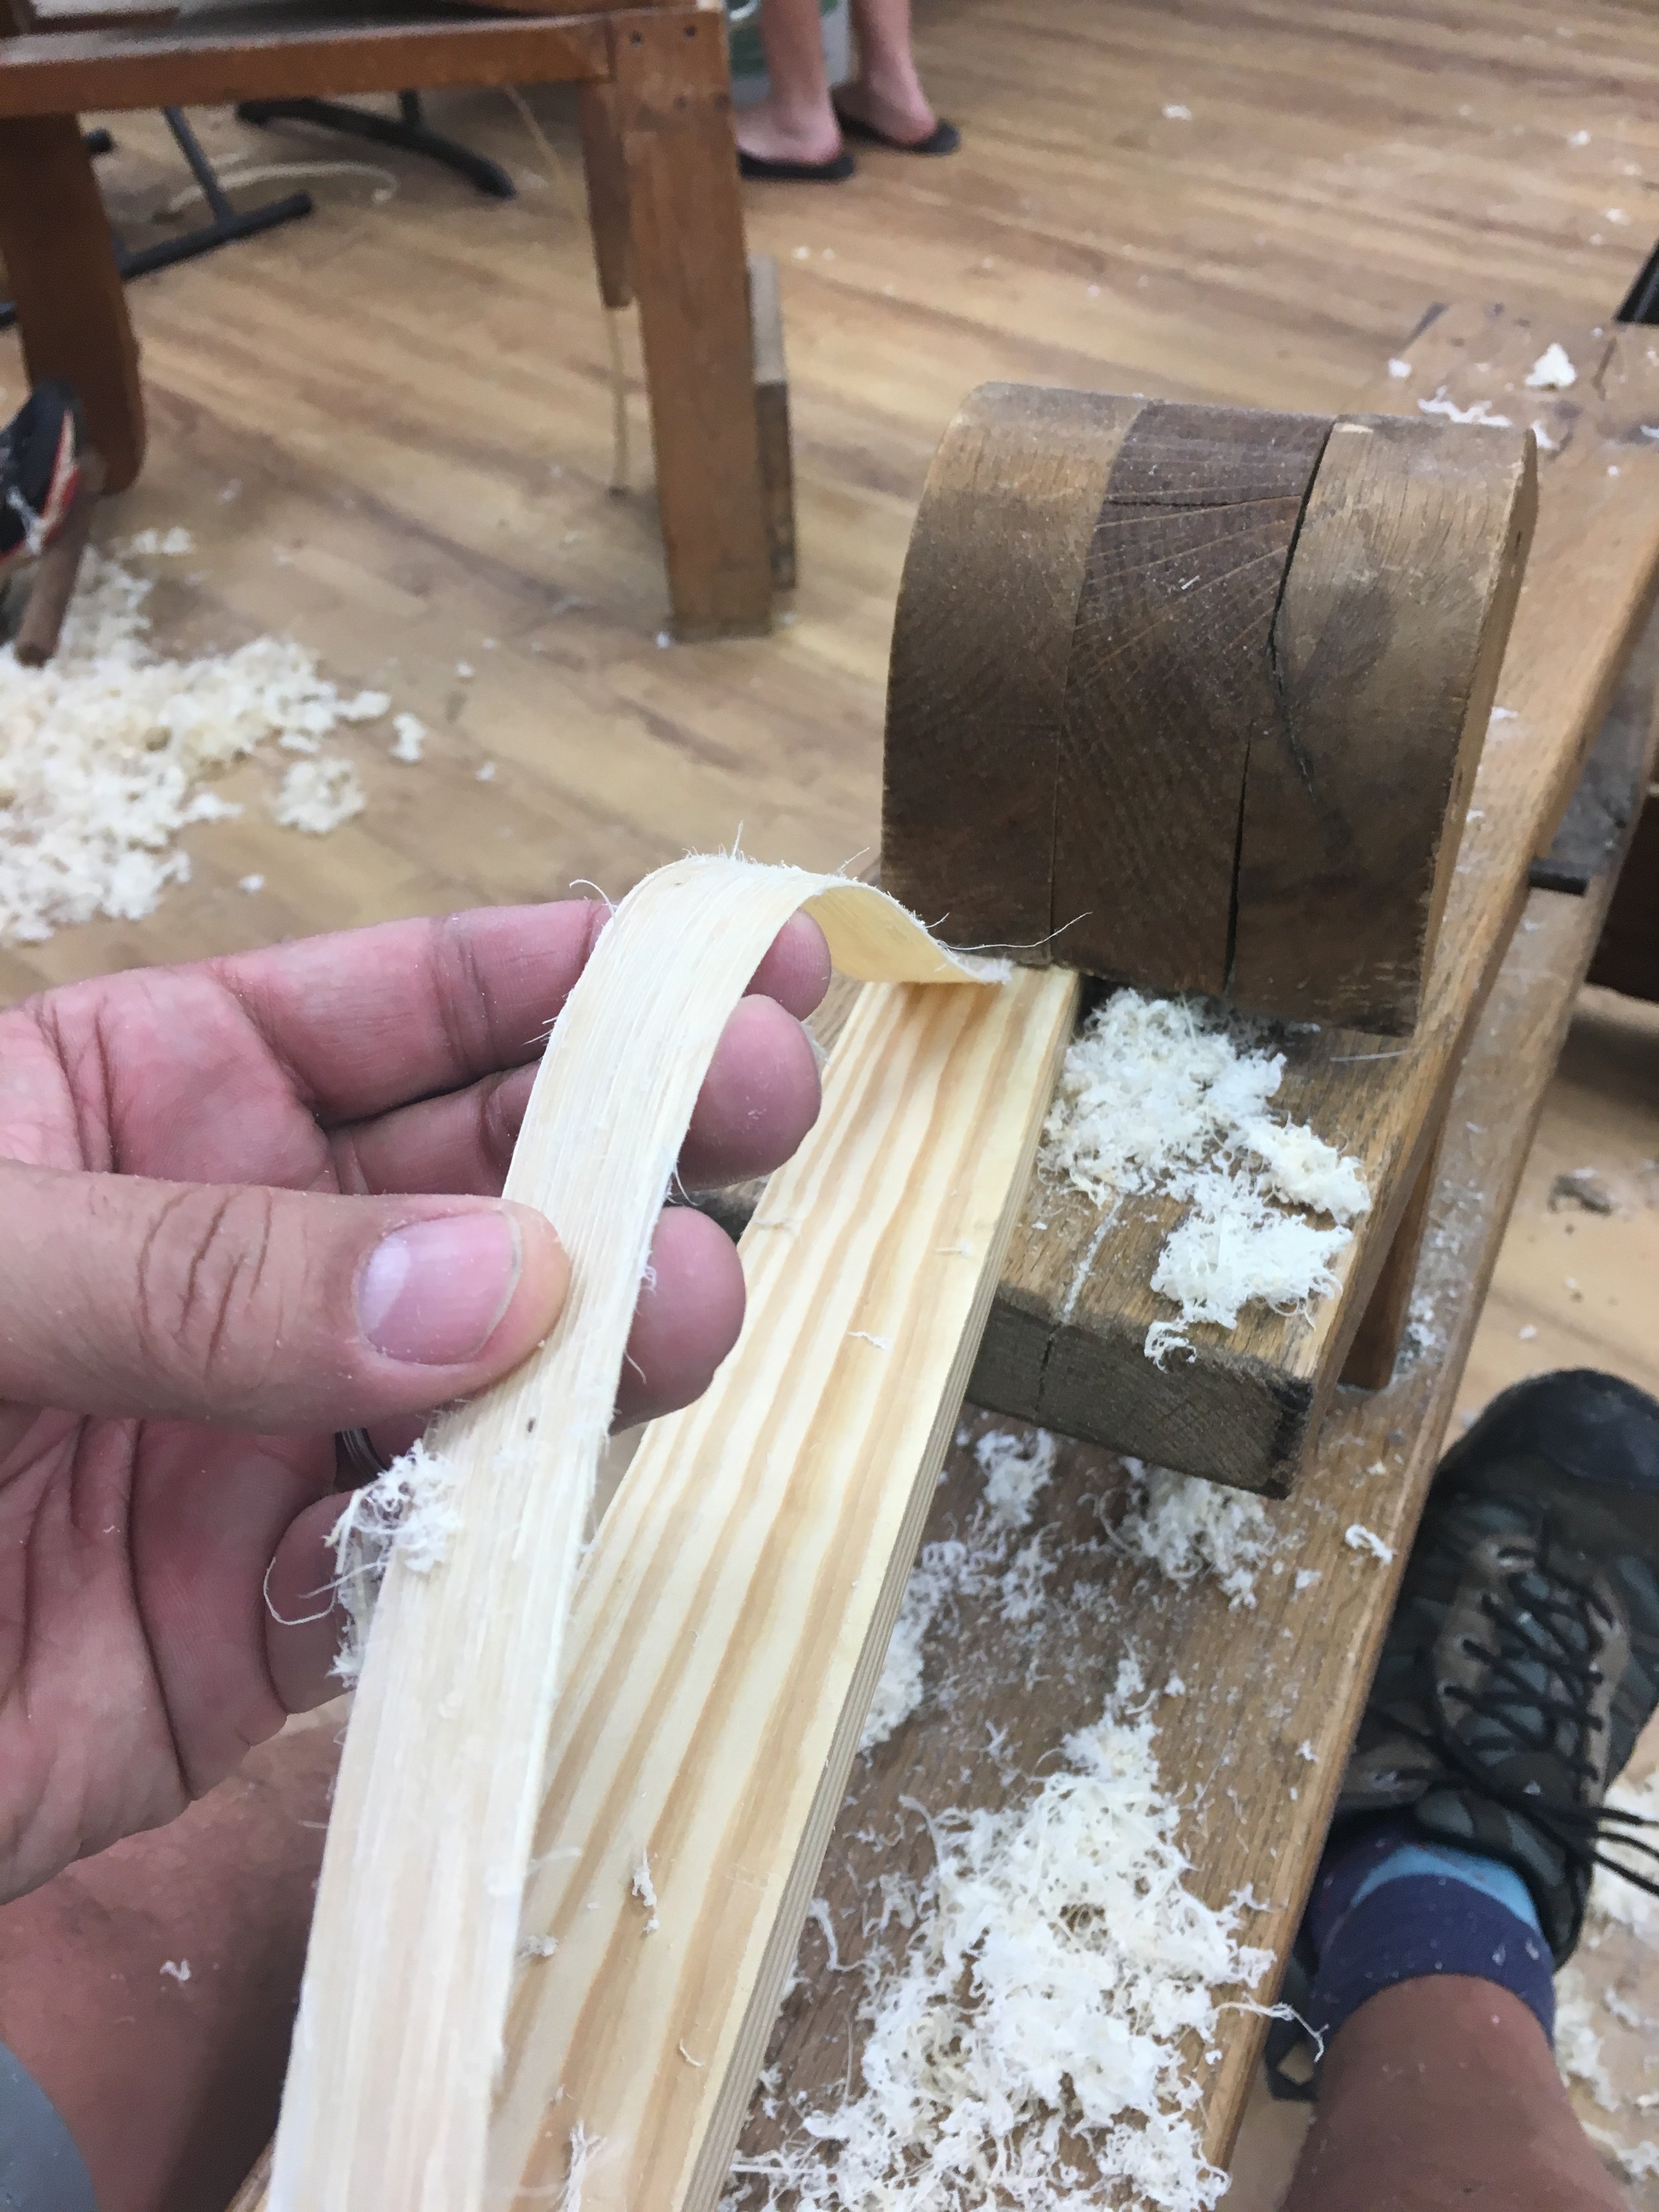
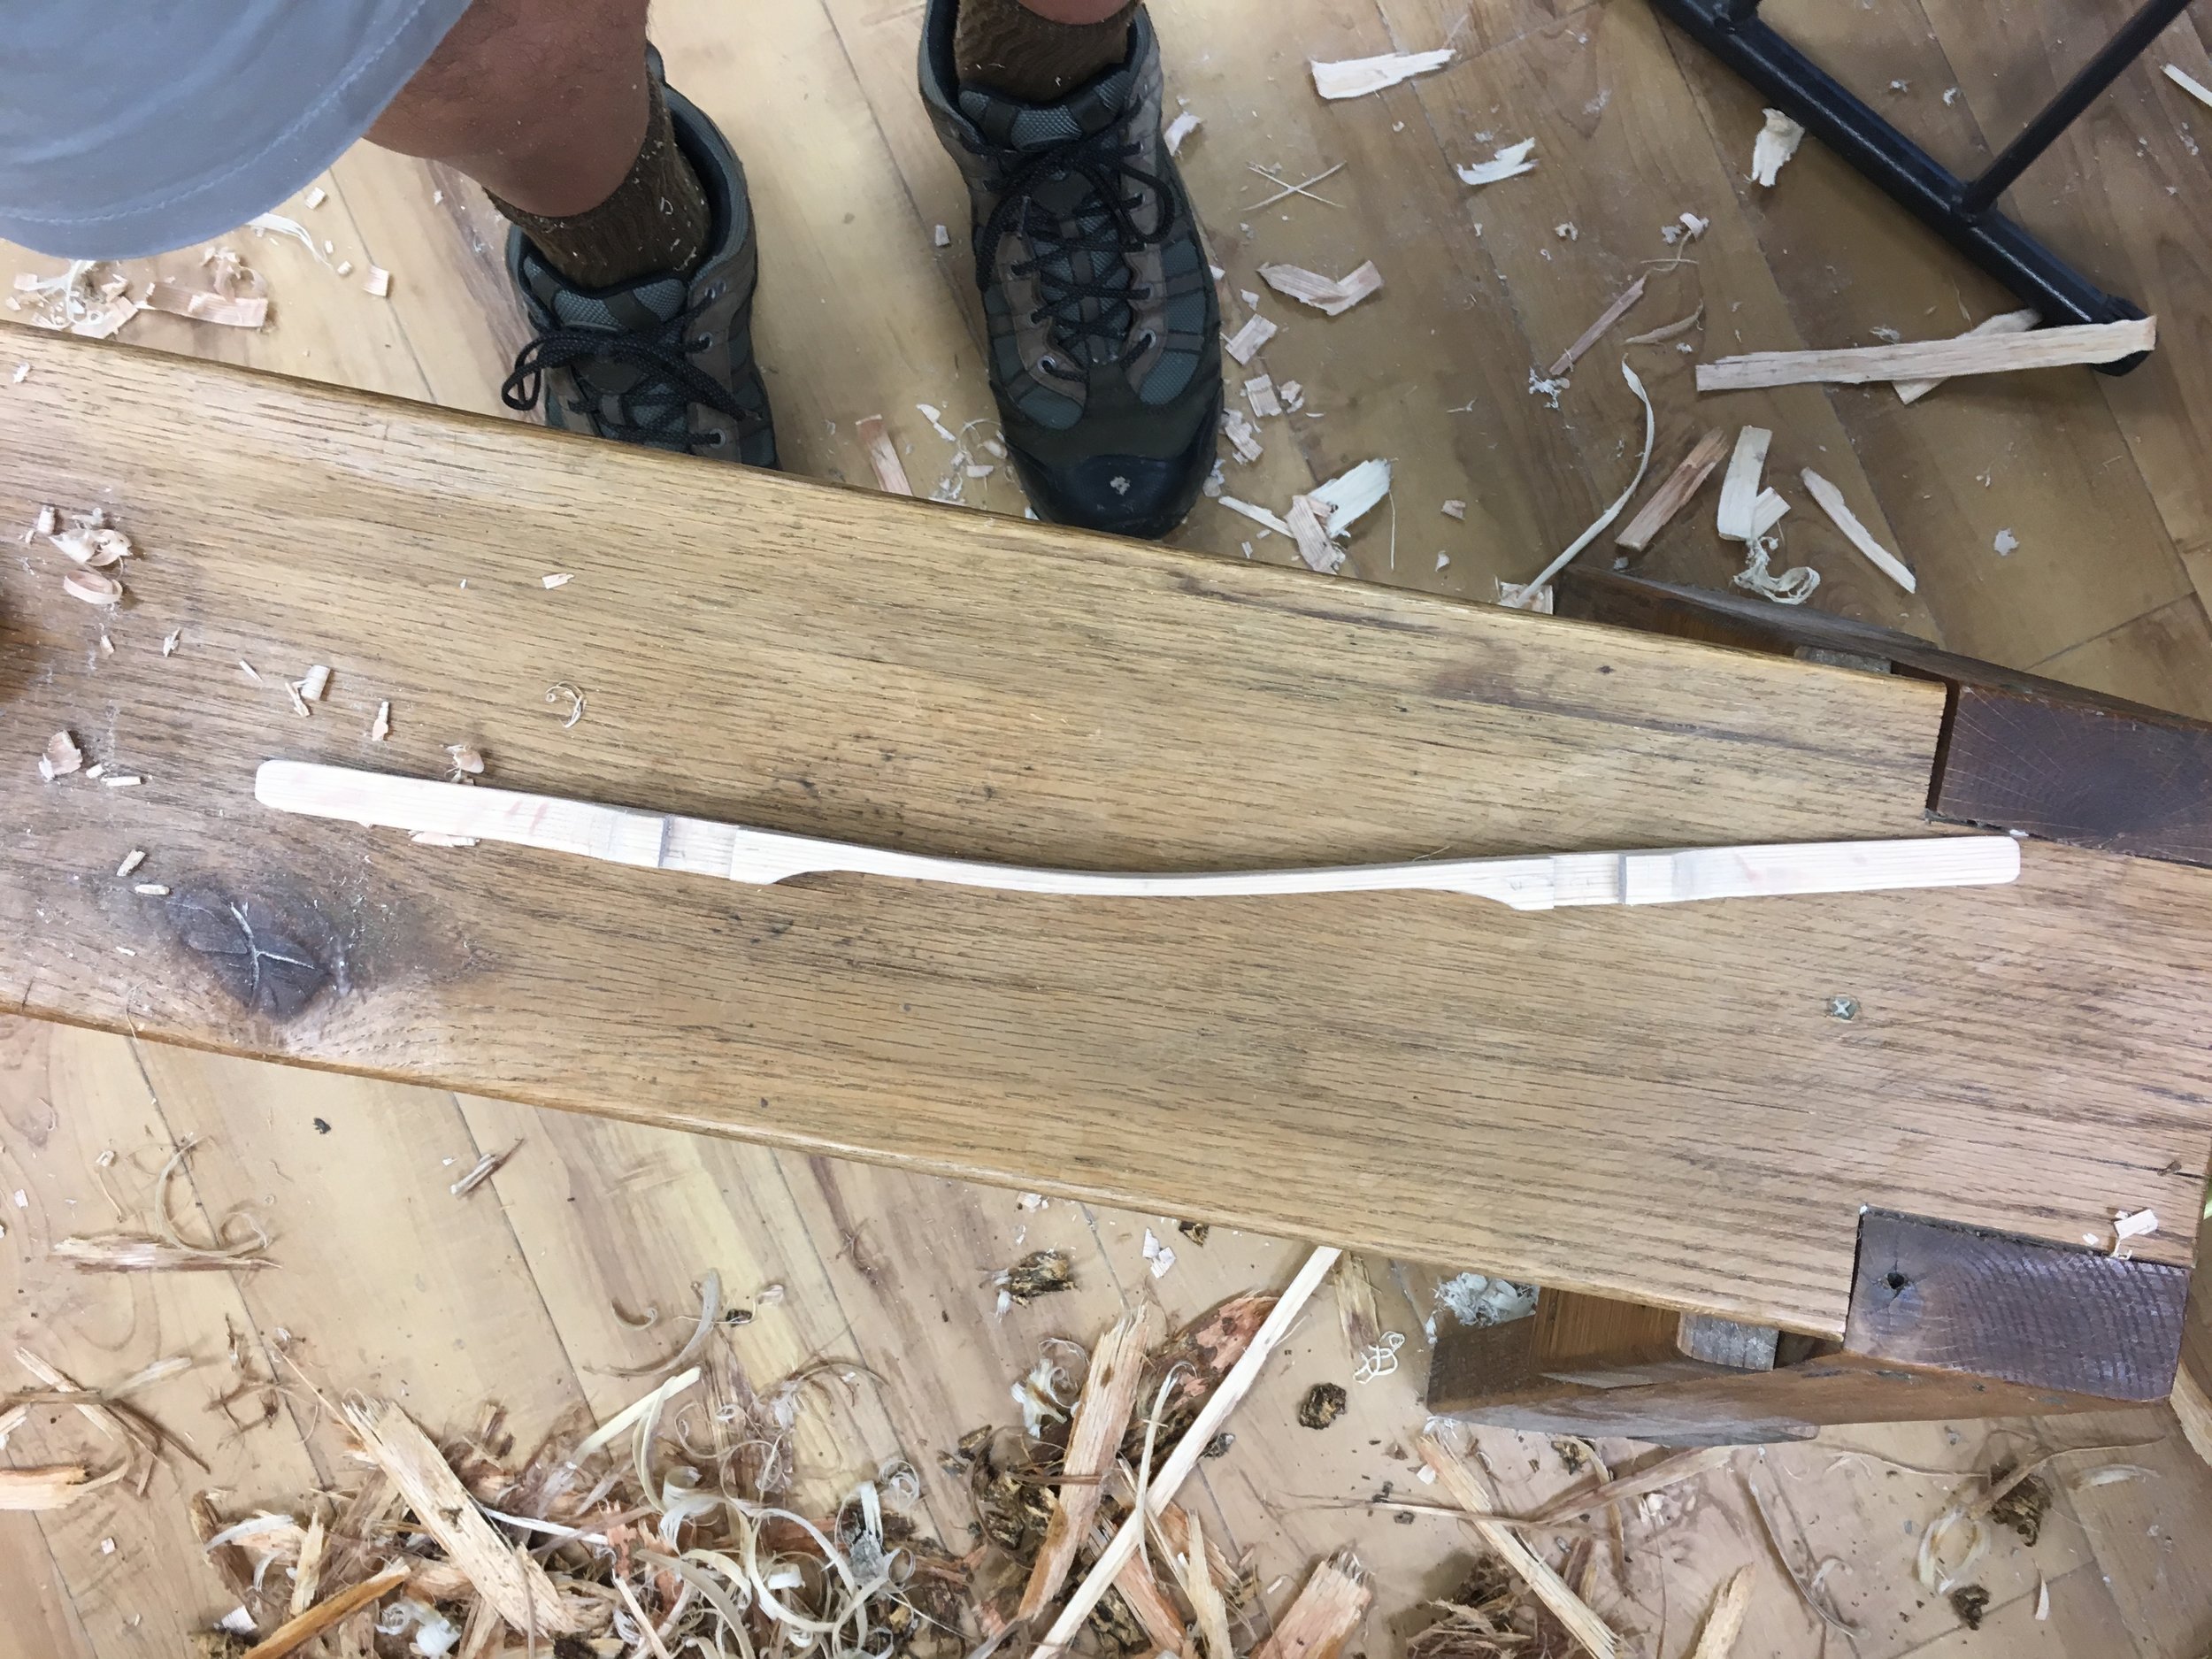
I've learned a three-step scraping process. First, I use the draw knife to thin the piece of white oak to a consistent thickness. This is done using the draw knife in its typical fashion with the blade planing away shavings of wood. Second, is to turn the draw knife around and use it as a scraper. This is a safer way to remove material with much less chance of digging into the splint and ruining it. Third, is to do the final scraping with the scraping knife on my knee. This final step removes chatter marks and, when the scraping knife is properly sharpened, leaves a very smooth surface. Key to all this work is having a thin splint to begin with. The thicker the splint at the start the more that has to be removed, and so the more time and effort it takes. Making good splints through splitting, rather than scraping, is essential to making the process faster.
Today, I also learned (again) that planning is important for any basket. I spent some extra (wasted) time preparing white oak uprights that are longer than required for the basket I have planned. So I cleaned and prepared extra inches of material that are unnecessary and will inevitably end up on the workshop floor. It might only have been 20 or 30 minutes, but may have been up to an hour. Sure it's good practice, but time is getting very tight and every minute counts. So having a plan and, more importantly, following that plan would save me time and effort which is key in a labor-intensive process like this one.
Day 05
Tonight I am too tired to write after day 5, so I'll let pictures tell the day's story.


Day 06
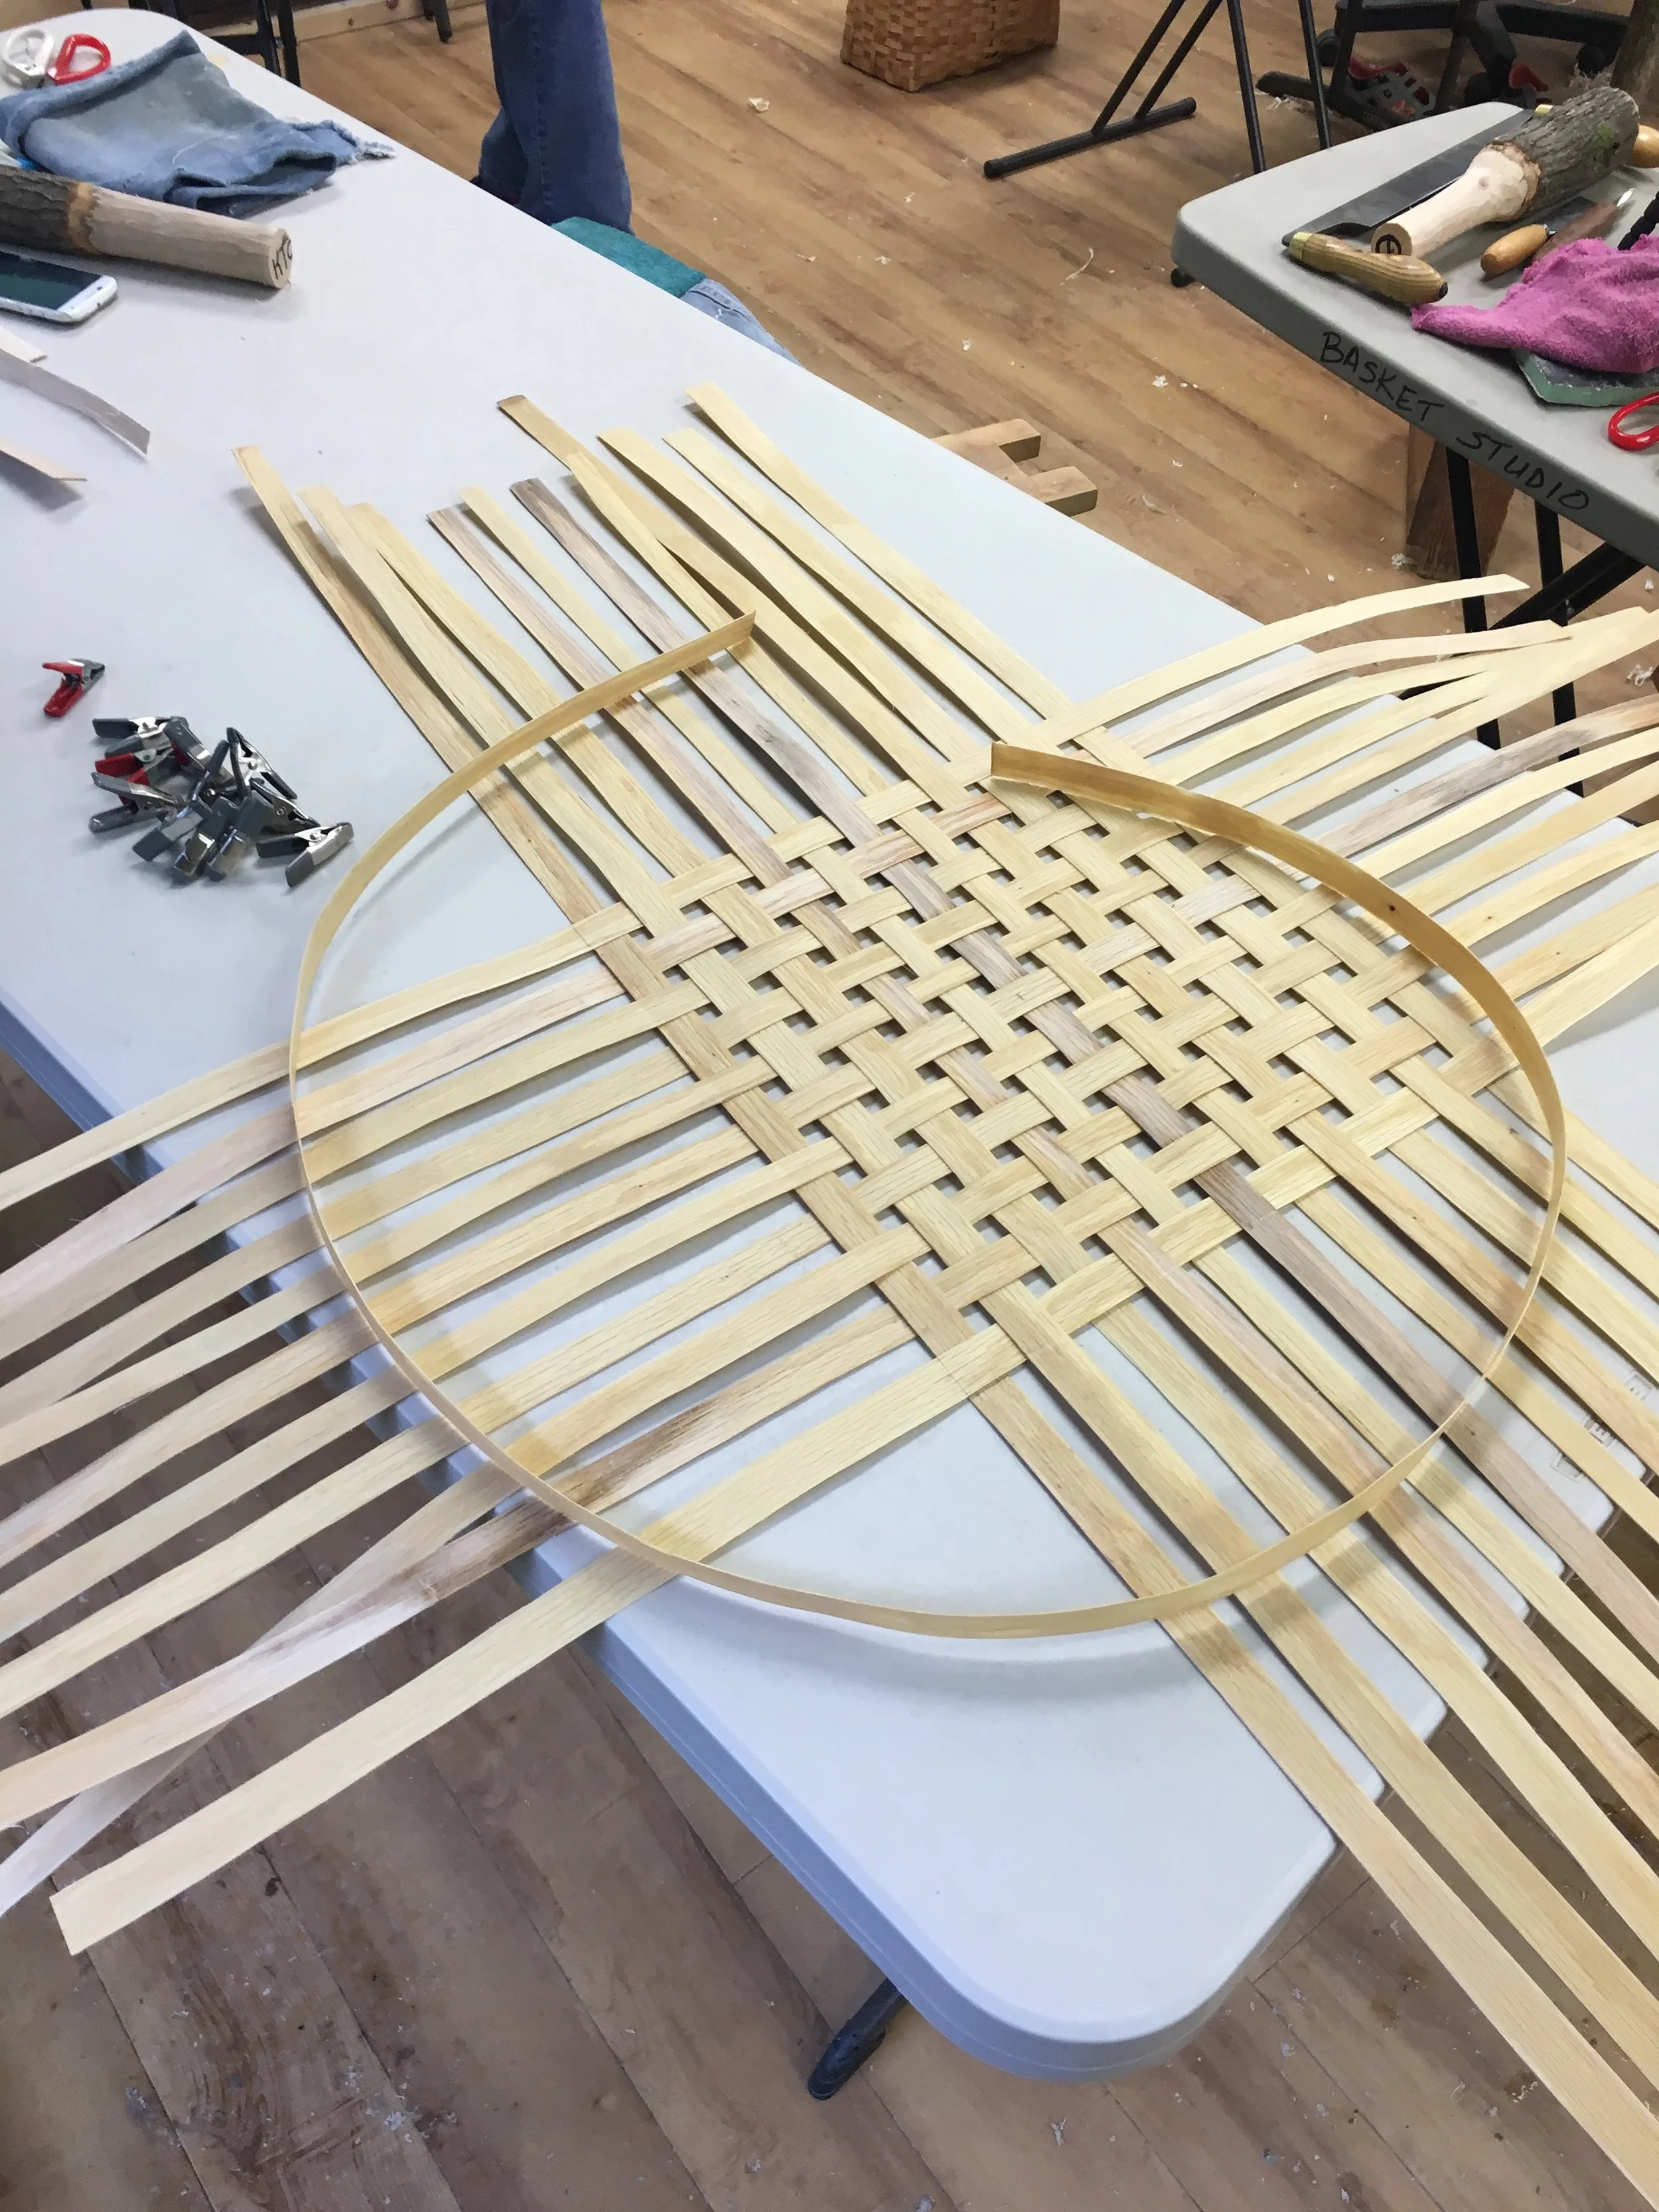
I didn't post yesterday because it was just a long day of hard work. Things needed to be done so I did them. I finally had all my uprights and weavers complete and could begin the weaving process. Getting to finally weave was exciting and a relief. First step was to decide the layout of the uprights. Each upright is slightly different in color (some are heartwood while most are sapwood) and width, so a pattern will be created depending on their position relative to one another. I decided to place a piece heartwood in the center of each basket side and then put slightly thinner sapwood uprights to the left and right of the heartwood piece. These moves helped to determined this overall size my handles will need to be, and gave some symmetry to the overall basket design.
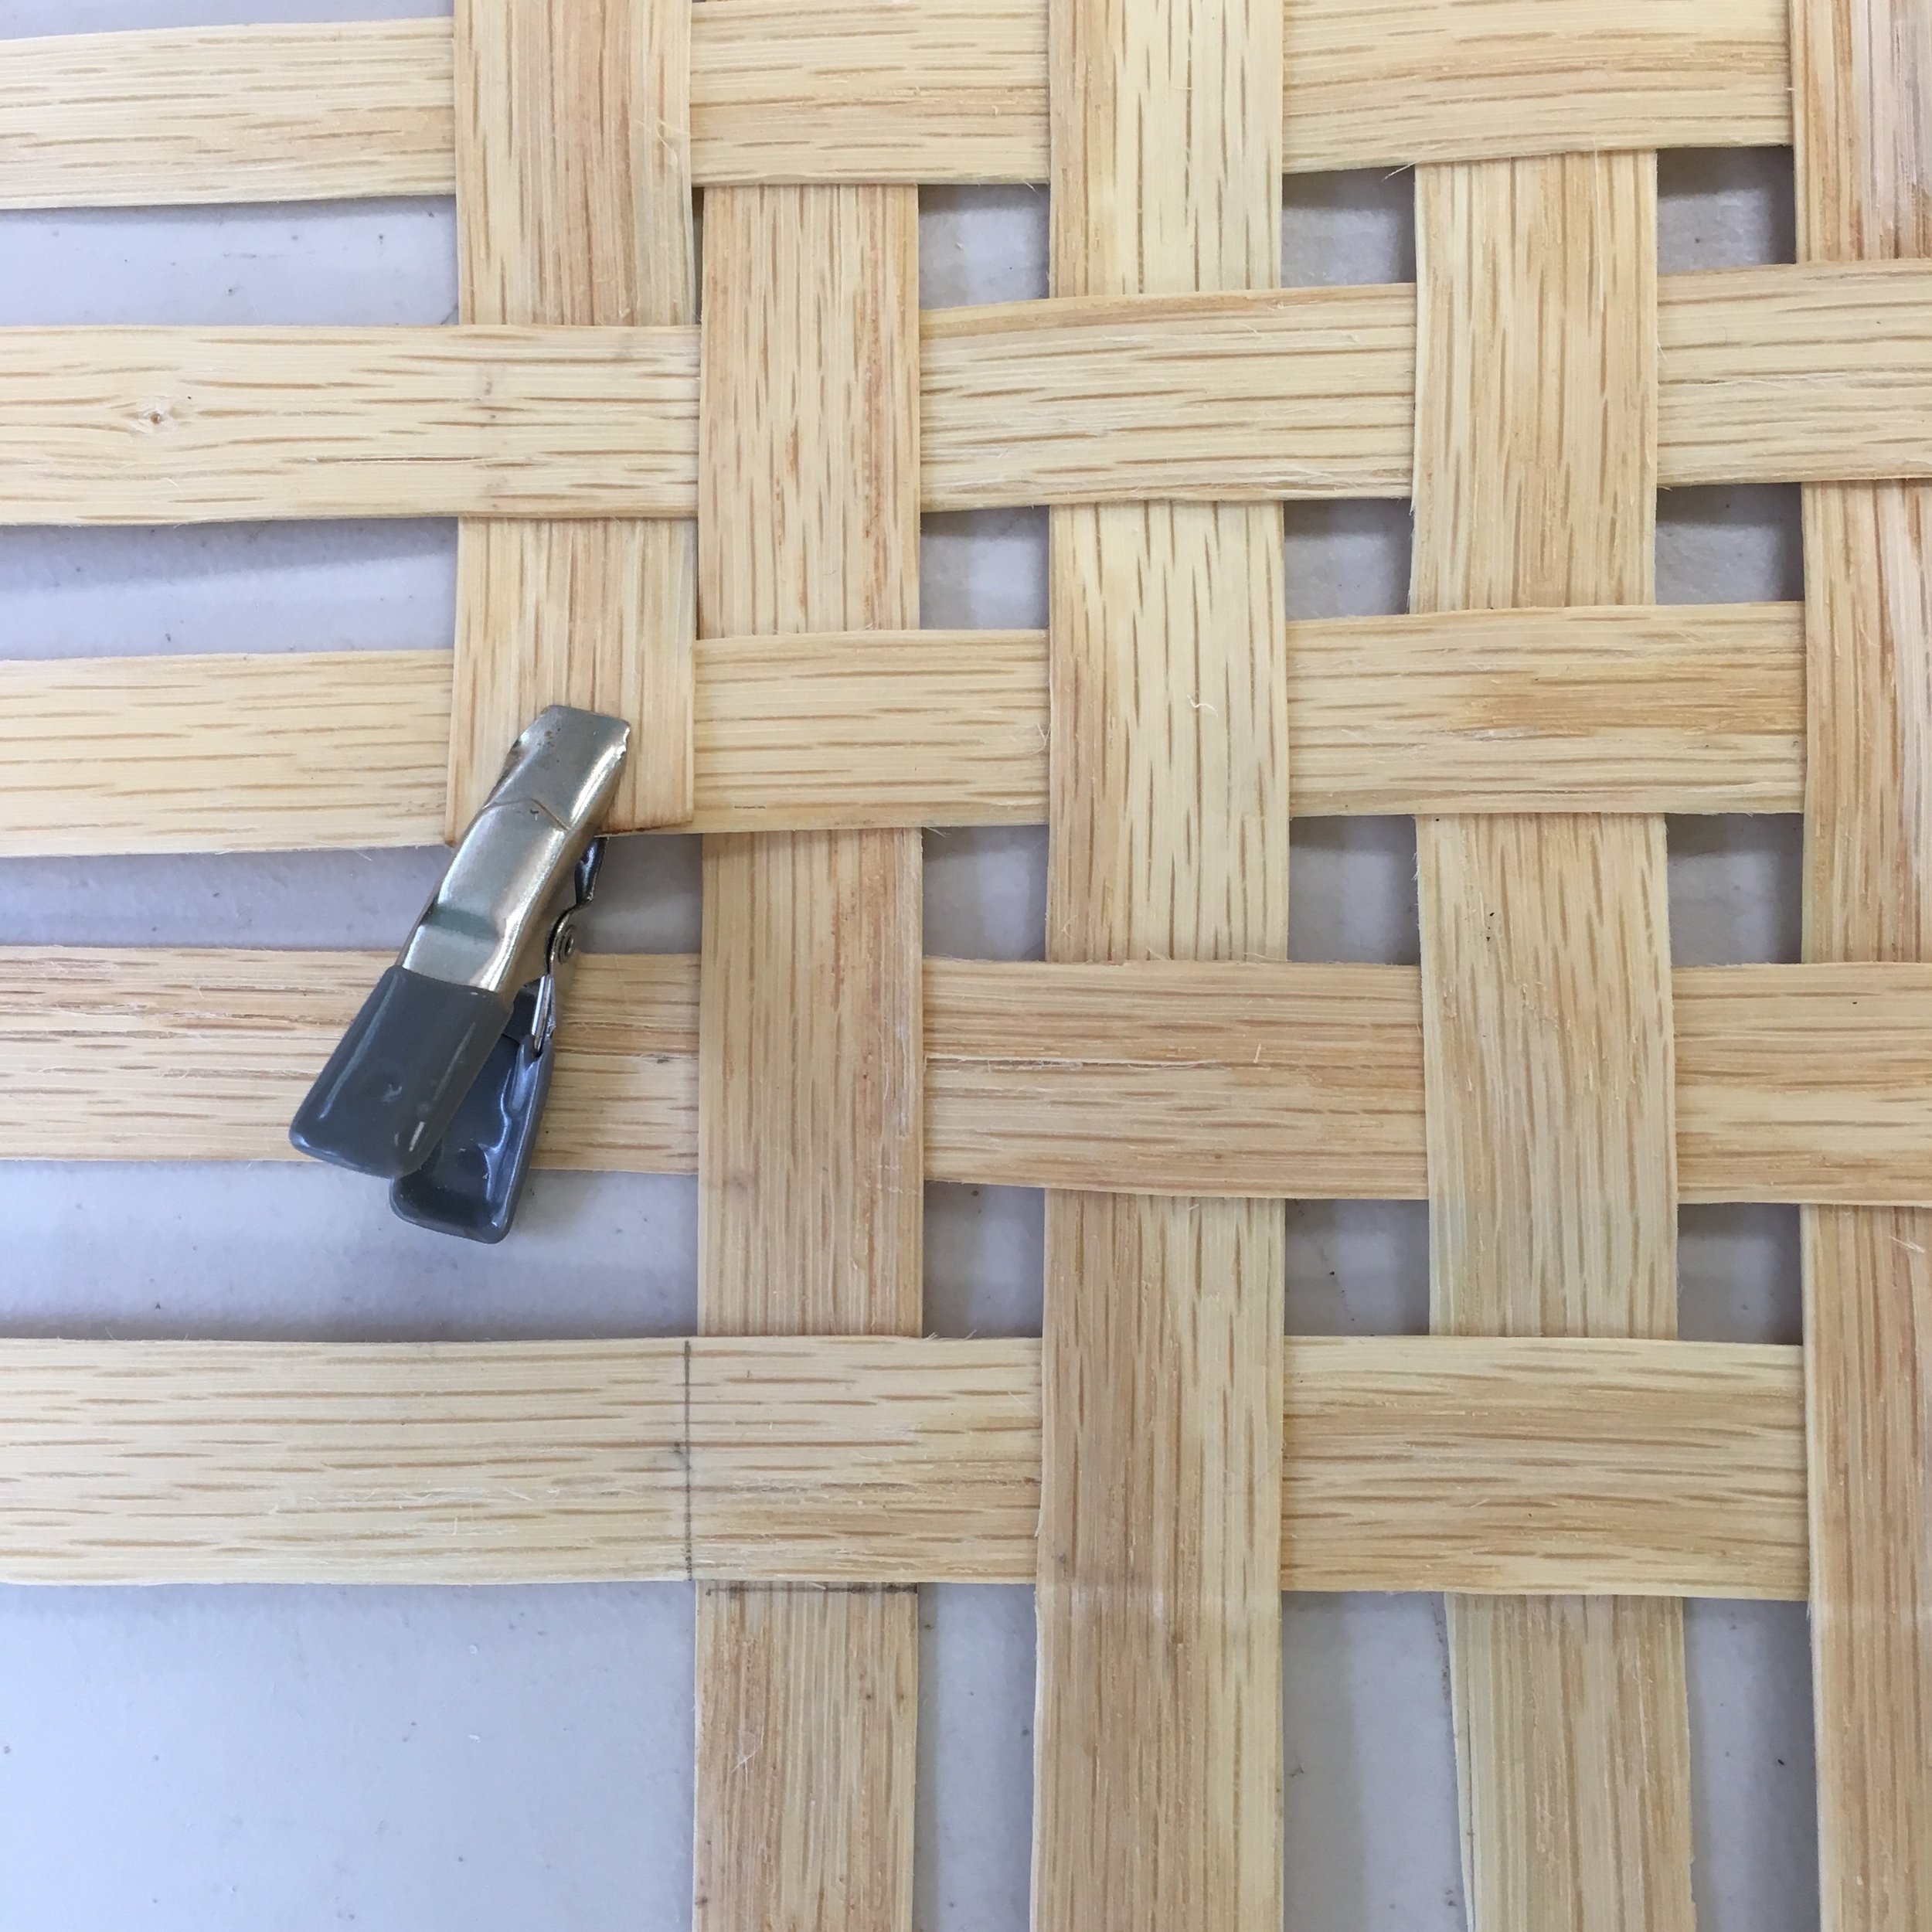
The basket itself was not hard to weave. It's a straightforward base, and the weaving is a stop-start over-under. With the start of the weaving, MaryAnn took charge of the teaching took, and it was incredibly helpful. The layout of the base was nothing special other than studying the individual pieces, and getting things even. But in the simplicity of the weaving I found a calm place amidst the rush toward completing the basket on time. Conversely, I also found the start of the weaving to be something monumental. I have spent almost 4 days preparing this material, and a couple late nights staying up to midnight to get these done (not sure why I seem to be slower than many in the class, maybe, hopefully, just taking more care). Each weaver and upright holds a TON of embodied energy and time - my energy and time - and so the materials have an intrinsic value that I have not woven with before. So while the weaving is simple, the emotions are very complex.
Turning up of the uprights was straightforward and the minor cracking that occurs at the bend is to be expected. I need to sand those edges a bit more but don't really have the right tool to get in those tight corners. With the uprights turned up I started to weave. I started with a weaver at the bottom that was flexible but not too thin. This will allow it to make the requisite corner turns, but also sets up the strength of the overall basket. Being a start-stop weave each row is done individually (as opposed to a continuous weave). With each new row I rotate the basket a quarter turn so that the start-stop is never on the same side. For the first two rows of weaving the corners are bent at a 90° angle, after that they're allowed to go 'round'. At row three I let the weaver curve around the corner, starting the transition from square base to round top. This transition of form is one of my favorite basket weaving moments, and always feels magical to me.
The overall tension I kept in the weaving was ideal as the diameter of the circular opening at the rim is very close in dimension to the square base. This makes it so the sides flare just slightly. While weaving I decided to put five narrower weavers at the center (see the testing of this in the images above) of the basket to give it a bit of visual interest. I think I'm the only one in the class who actually changed the dimensions of my weavers, but I think this band will give the finished work a subtle texture, and will add a dynamic quality.
Once all the weavers were done I started work on my two handles. Handle carving took up the rest of my day. The handles are made from the heartwood of the tree. First a draw knife is used to square up a piece, and then drew the pattern of the handle onto the wood. A combination of draw knife and carving knife gets them to shape. After a long day in the studio, I brought the handles home at 11:30 PM to do some finish sanding, and went to bed feeling very satisfied, but completely exhausted (and so I'm writing this today and not yesterday). I also knew I had to be up bright and early today to get the basket done...and there was still a LOT to do.
The final day started early, with work on the rims. I had the rough heartwood pieces soaking in water, and got into the studio before breakfast on this final day to shape and finish them, and get them on the basket. Once they were done and sanded, I inserted my two handles on opposite sides of the basket. These I had bent myself which was a nervous experience; after so much work I didn't want them to crack or break which would have meant starting over. Using my thumbs, I followed Bill's direction and slowly 'worked the fibers' of the oak to bend. With the handles bent, they were inserted, I added the rims, held all in place with zip ties. I was now ready to do lash the rims, making the basket top secure and strong.
For the lashing, I was blessed that Bill and MaryAnn had made the material for me, as they did for a few others in the class. Without this help I'm not sure I would've gotten my basket done. The lashing is the thinnest of the material as it's required to make very tight turns around the rim, securing it them to the basket. This is the one element on the basket that was not made by my own hands, and both Bill and MaryAnn wanted to make sure I was okay with that, in case I wanted to do it all myself. But when I look at that lashing I cherish the fact that the hands of my two wonderful teachers are represented in my final work.
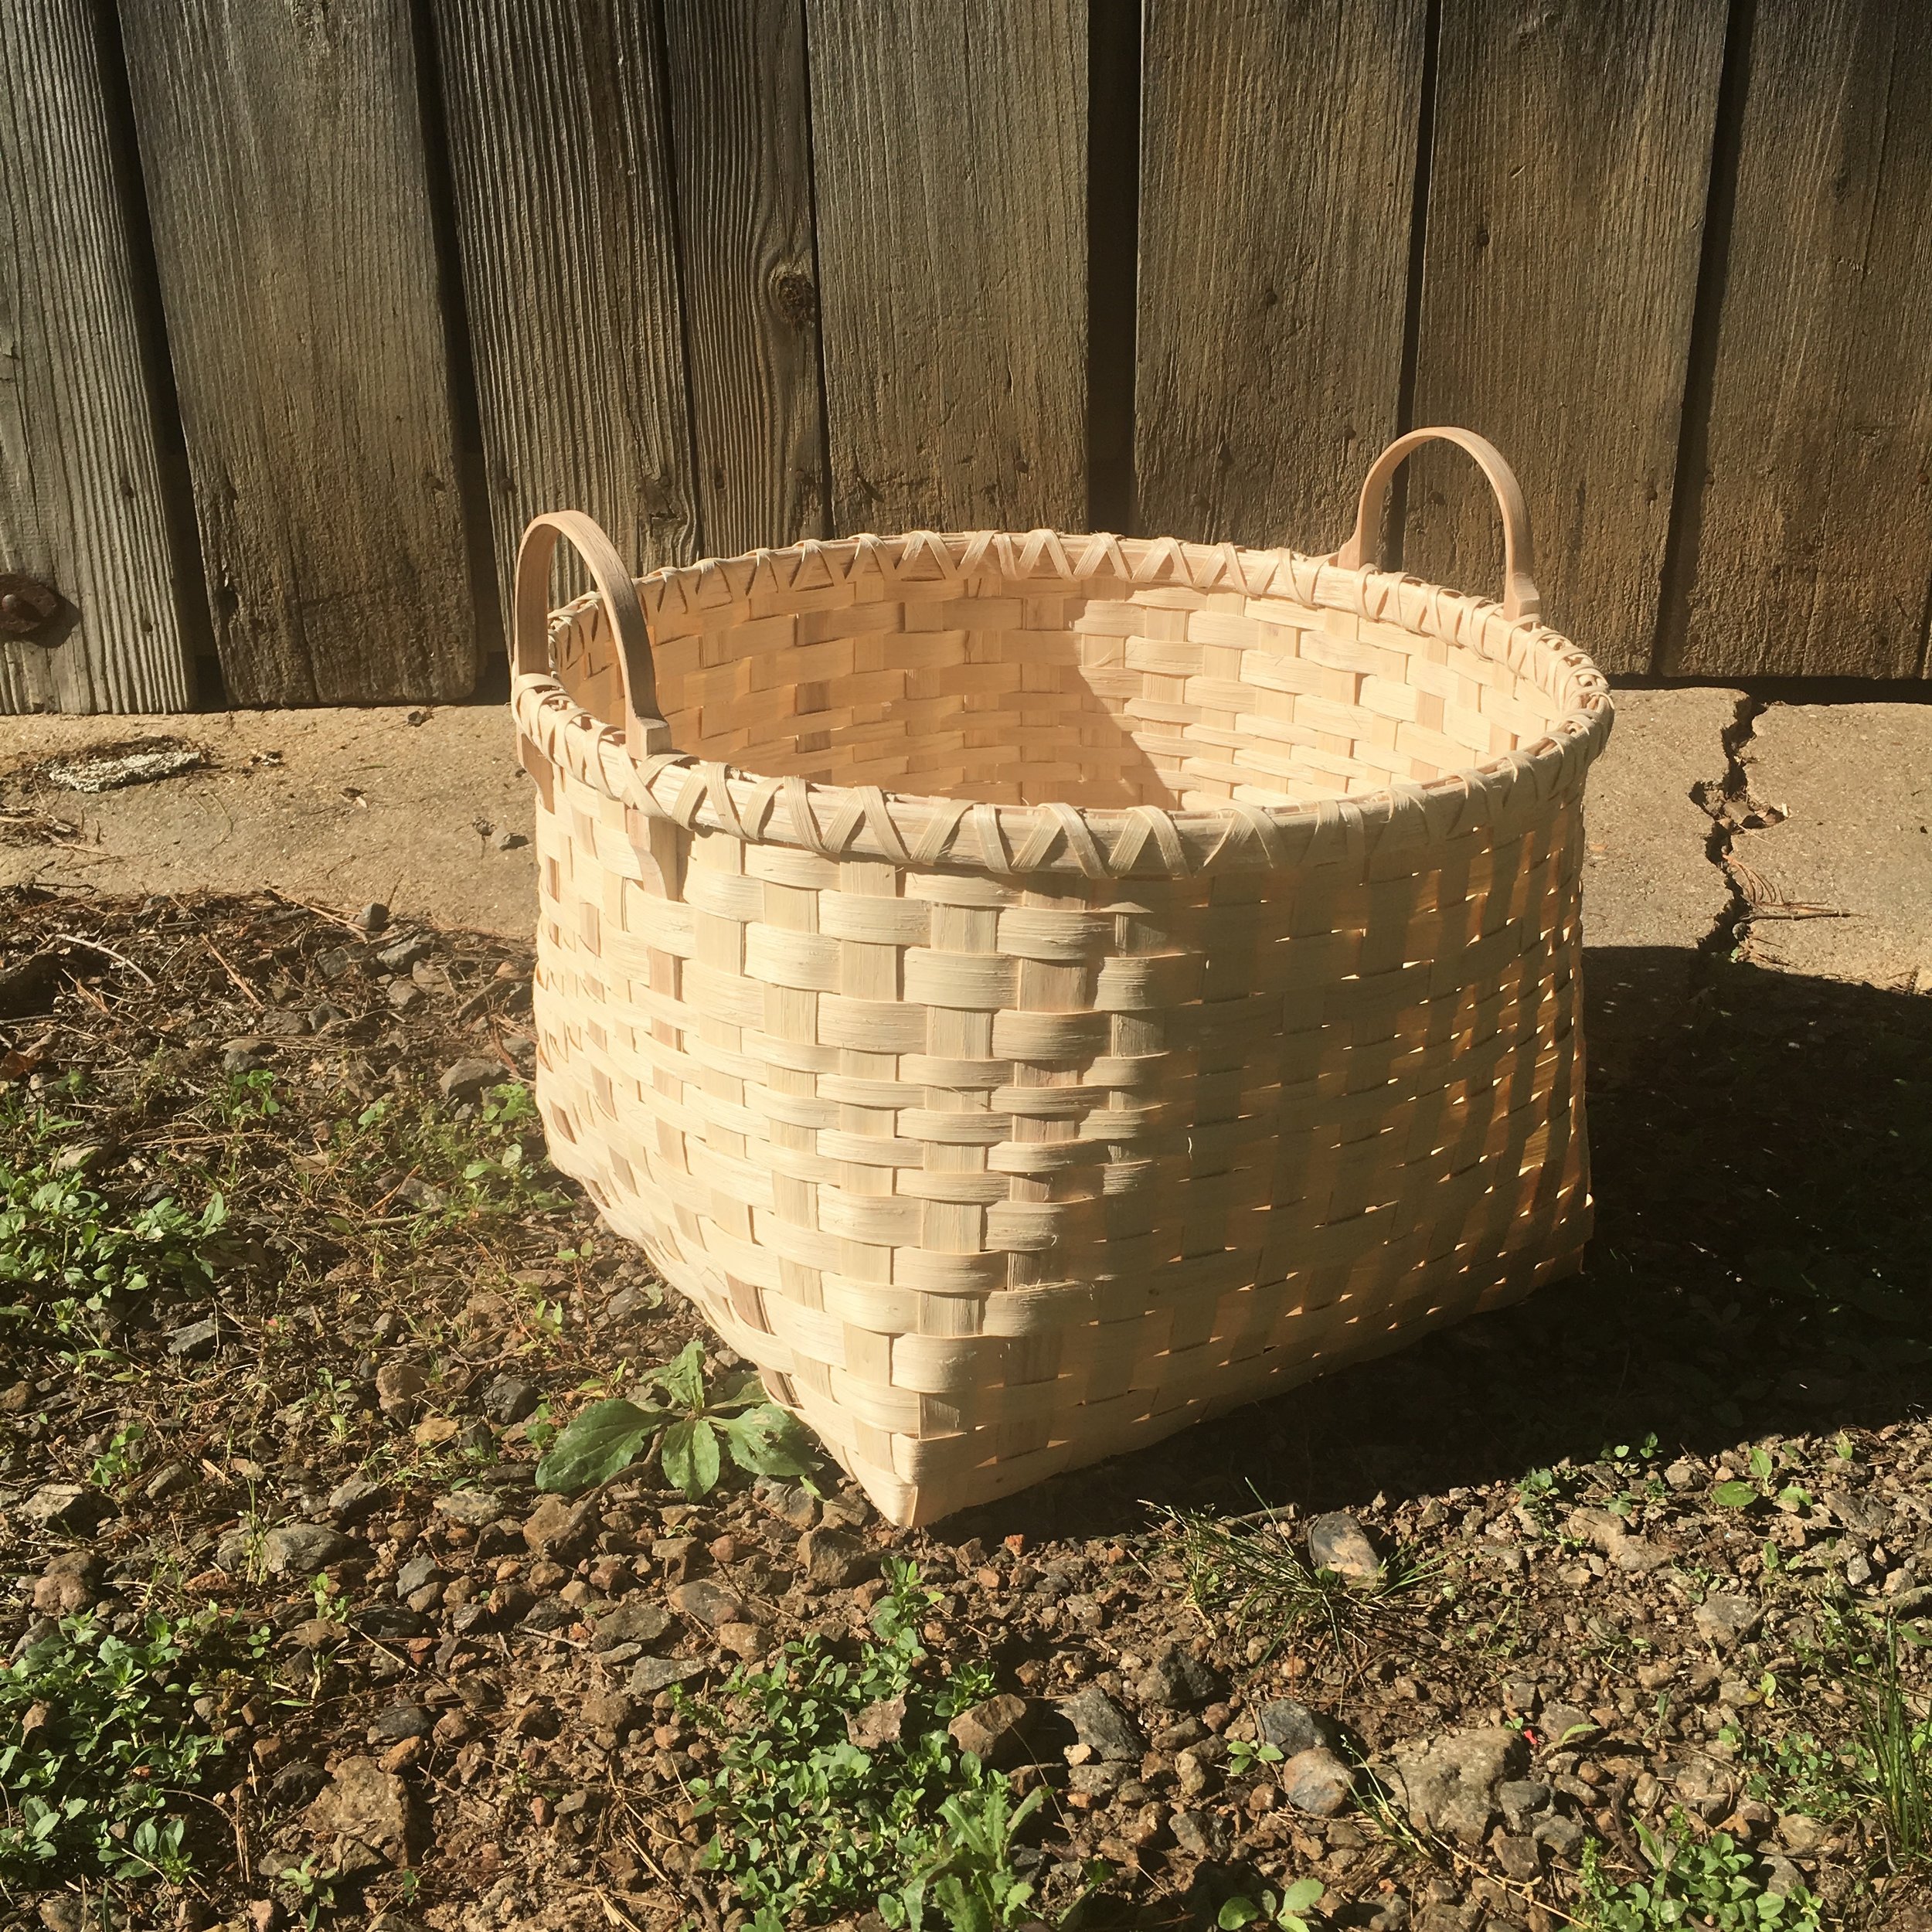
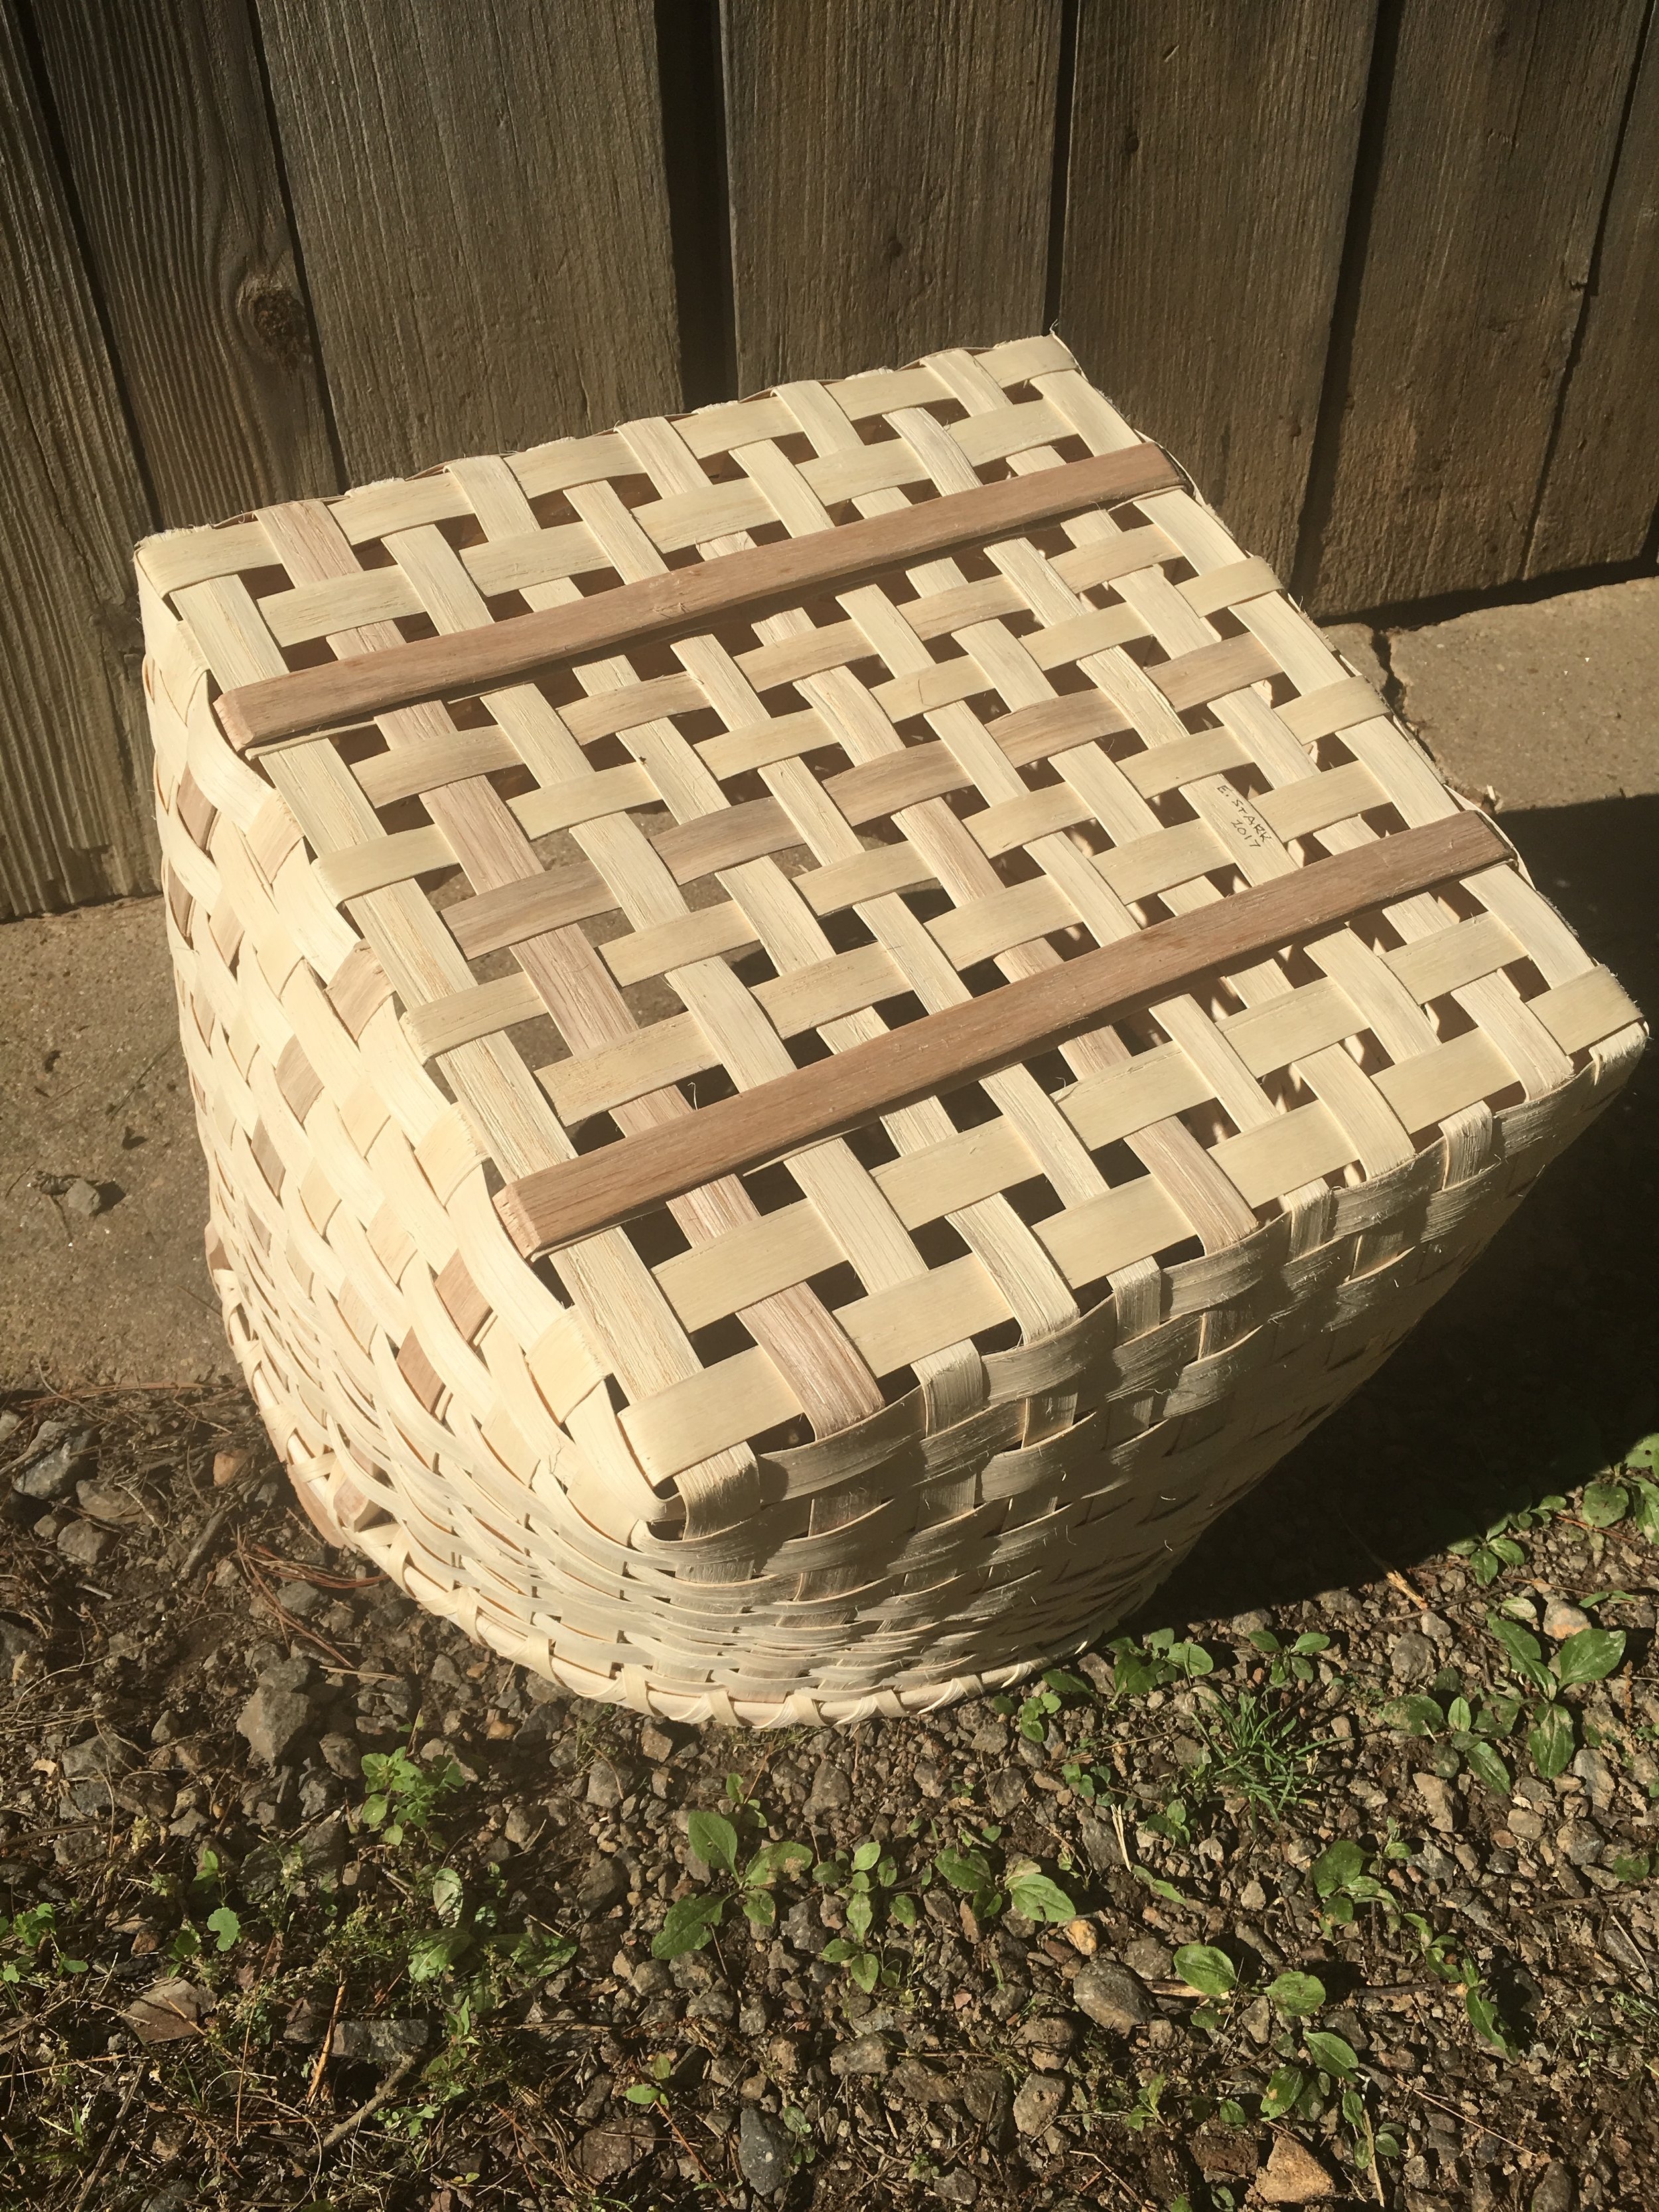
In another lucky moment, Nancy (a weaver from the midwest) suggested I not fill-in the bottom of basket. Most students added additional pieces to fill the openings left in the base, but Nancy hadn't liked what it did to her work, and so suggested that what I had was already 'so stunning' it didn't need or want filling. I took her idea to heart. This not only saved me time (yea!) but gave me the idea to add heartwood skids to the base of the basket. This was a last minute addition, and required I find the heartwood, design the skids, size them, rough them out, test them, adjust them, and finish them...all with the clock ticking to the end of class. I got two skids done in one hour and 18 minutes, and I think look pretty darn good. The bit of color at the base makes the overall basket more interesting, and the thickness of the skids will protect the basket base allowing for great use.
The finished work is a type of a bushel or half bushel basket, I'm not sure which. I think the finished basket is a strong piece, and not just because of the 49 hours of time put into it. The success of the final basket is in part because I was consciously thoughtful about the design of it, and refused to rush to any conclusions during the process. I realize this level of consideration is one reason that I was so late in finishing the project. I stepped out of the given possibilities, reconsidered how I wanted to make the handles, considered the color and pattern of the uprights, tested the layout of the weavers and their dimensions, and considered how the base would be finished. I actually designed this basket, and did not just copy one that was held up as an example in class, or follow any given pattern. The fact that it's actually my design, combined with the hours and hours of effort, make this undoubtedly the best thing I have made in a very long time. While I made the basket in Bill and MaryAnn's class, and certainly could not have done it without their knowledge and input along the way, I own the design of this basket.


What Bill and MaryAnn gave me and the rest of the class was nothing short of amazing. They are such wonderful teachers and such giving human beings. They stayed late in studio without our even asking, they were willing to consider ideas and share expertise, and the entire time did so with humor and grace and laughter. They made this class a once in a lifetime experience. If I was younger and didn't have a life in Maine, I can imagine moving and becoming their apprentice...another life perhaps.
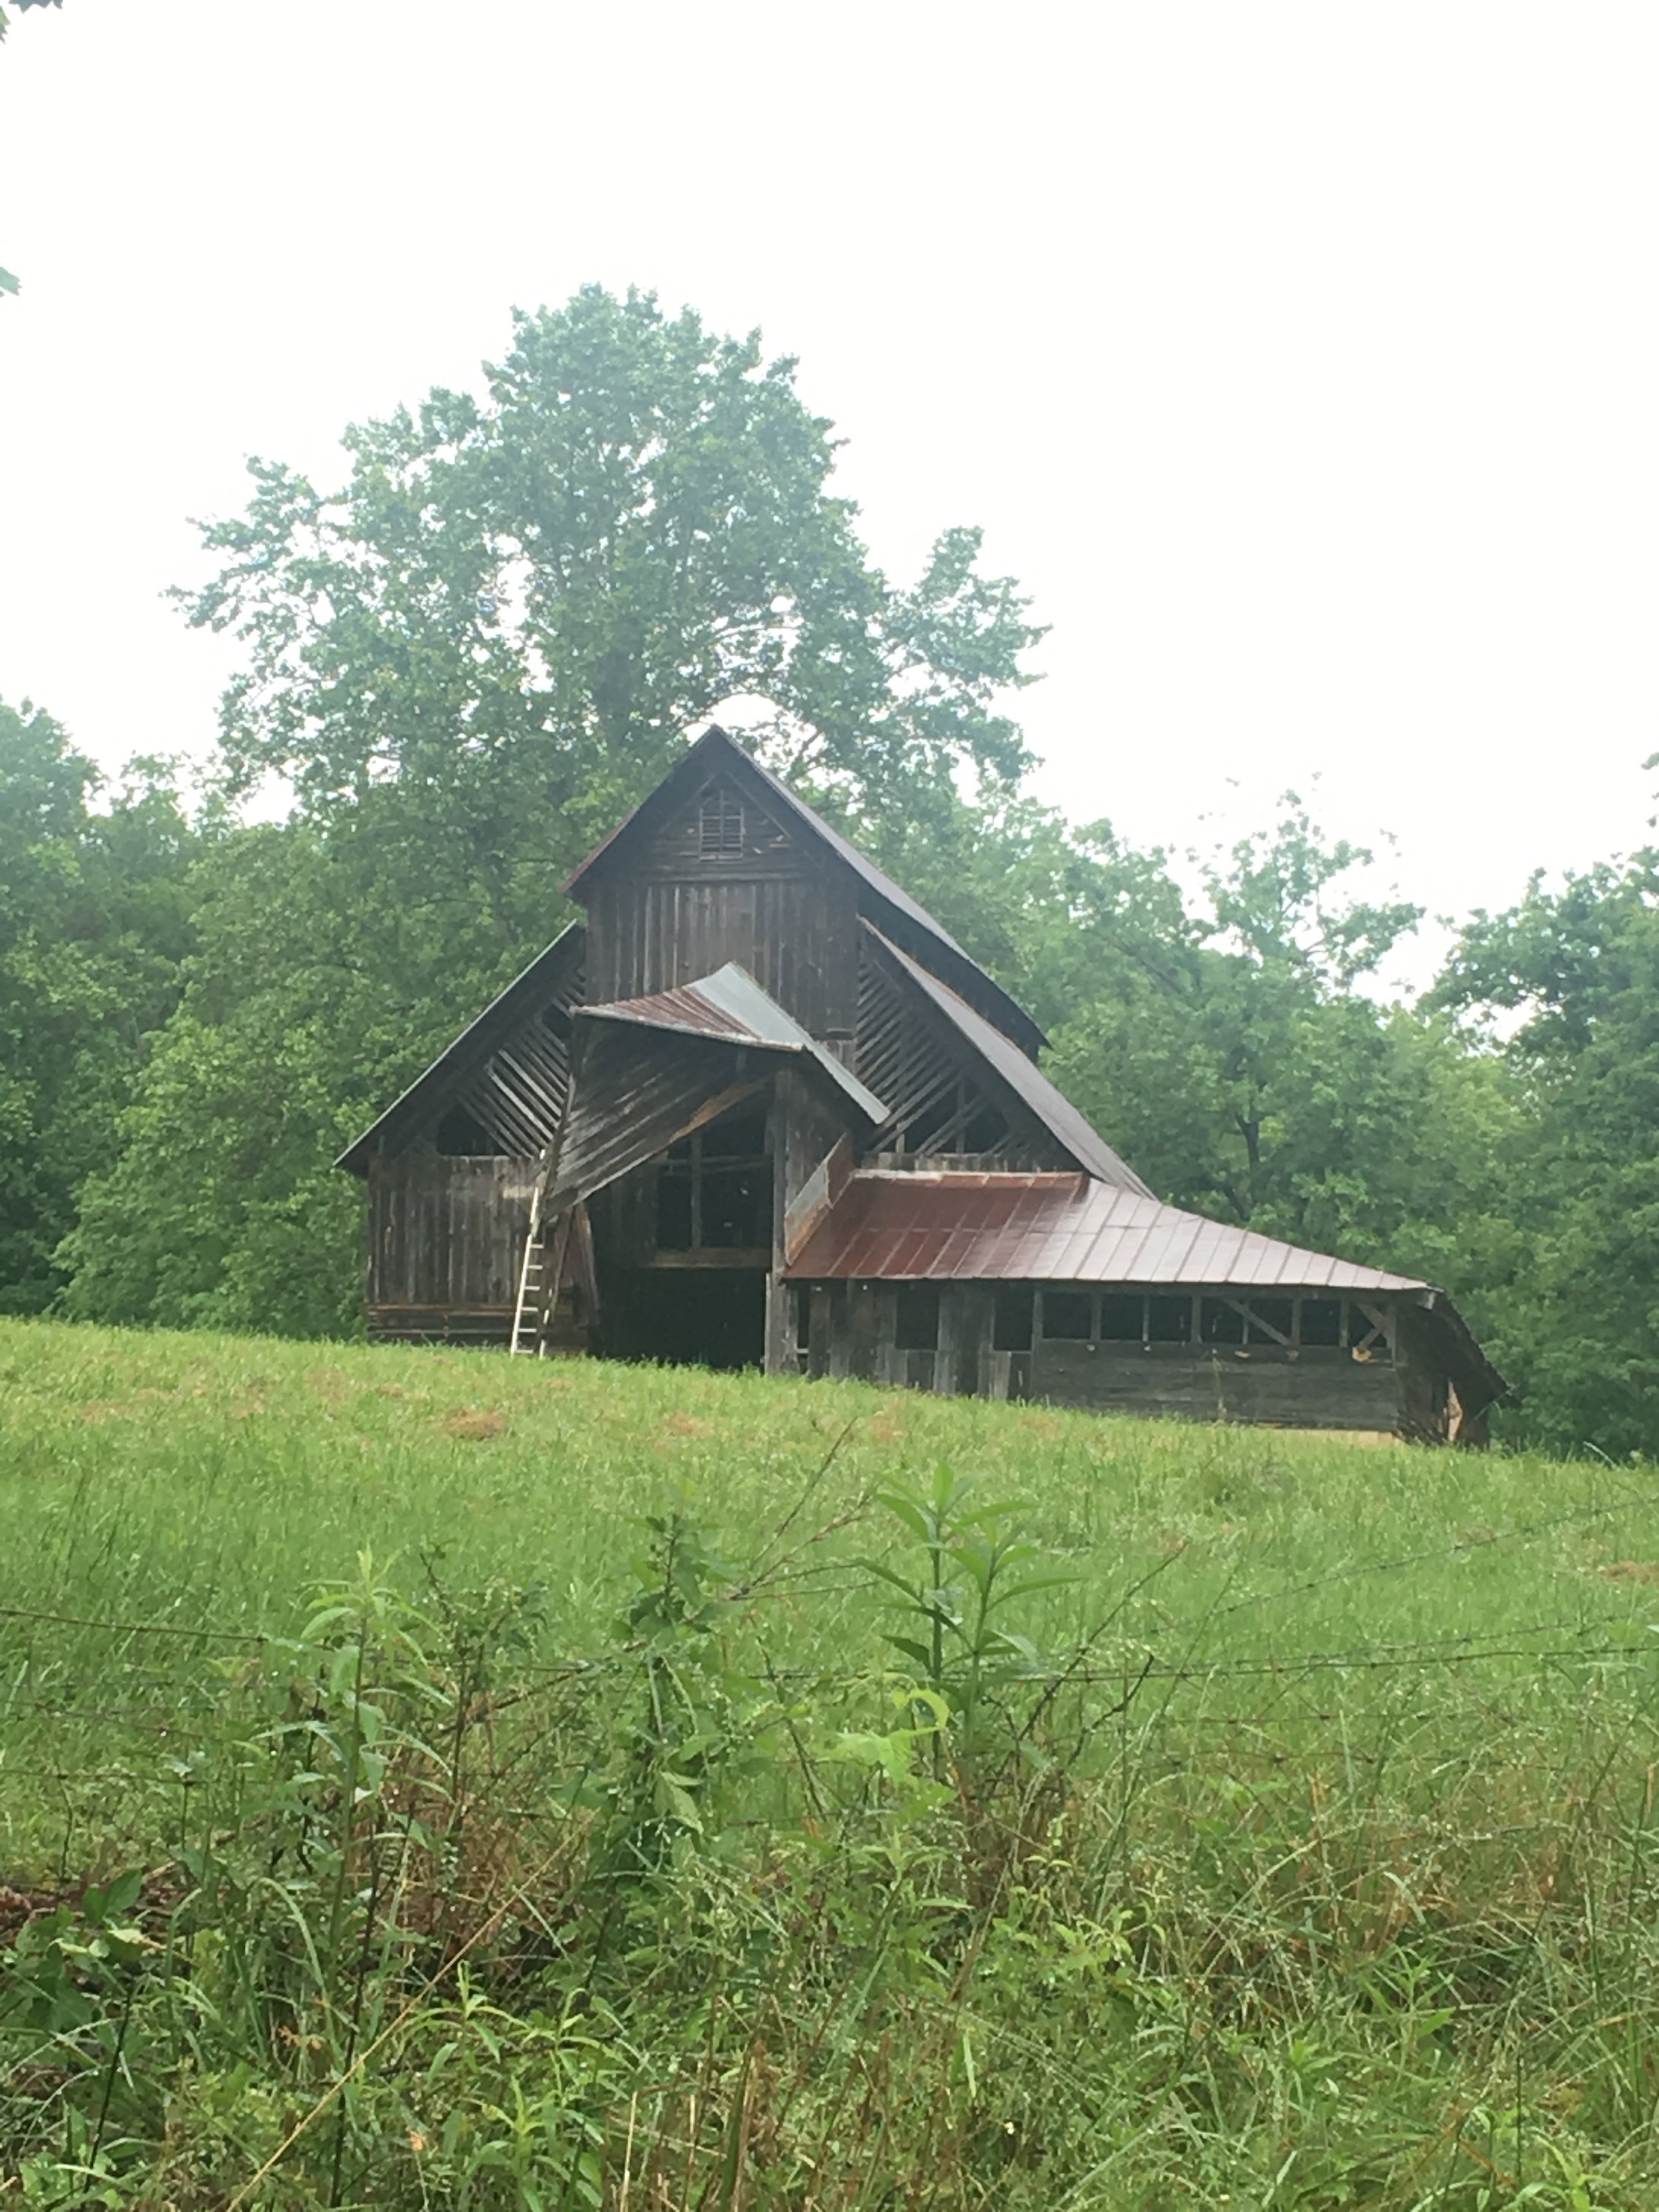
After the student show-and-tell today, where all classes present their collective work, I literally could not get out a 'thank you' without starting to cry. Bill just looked at me and said, "I know." It really was that emotional. Bill and MaryAnn had given SO very much to the class, and I had put so much time, effort, and thought into the basket, that it was simply overwhelming. (You can see work from the other classes held at John C. this week in the images above).
At the start of this class I really questioned whether this white oak would be for me. It's so much work. But the rewards and like nothing I've experienced in a long, long time. It feels so good to have put forth so much effort and to have it all result in something that I feel I can comfortably say is stunning.


I do love making these baskets. I would love to get a small piece of white oak only to make a smaller basket. Now that I have experience making the materials, it will be a white until I am interested in making something this large...it is a lot of work. I think I'd like to work on something smaller, maybe with 1/4" uprights and skinny 1/16" weavers. I think I could come up with some beautiful forms if given the opportunity.
So the work is done. The class is over. And I am exhausted. My hands are sore and tired, my shoulders are tired, even my butt is tired from sitting on the hardwood of the shave horse for so many hours. But I accomplished something great today. I struggled in the making of this basket, learning and making new things. It was great to work with MaryAnn and Bill Smith, and a number of other students were so gracious with their time and energy (Beth in particular). I will continue to think more on what this adventure might mean to me, and why I found it so fulfilling. It was a great week weaving white oak at John C Campbell Folk School in Brasstown, NC. It was a gift.
Well done.